Install at least v16.x or higher as this is the oldest active LTS version
Only releases that are or will become an LTS release are officially supported
If Node is not currently installed on your system, we suggest utilizing a tool such as NVM or Volta to assist in managing multiple active Node.js versions. NVM is a popular choice, while Volta is also a good alternative.
node -v # version should be 16 or higher
Install and Run
# clone the repo
git clone https://github.com/Saabbir/visual-testing-demo.git
# cd into visual-testing-democd visual-testing-demo
# install all packages required
npm i
# run single test
npx wdio run ./wdio.conf.js --spec visual-test.js
# run all tests
npm run dev
Notes
headless feature doesn’t work with browser.setViewport properly
checkScreen method works well while checkFullPageScreen doesn’t
sometimes color differences are shown event if the images are identical
Editors have built-in knowledge of the programming languages and processes commonly used by programmers, which is intended to increase the productivity of the programmers. They also help to format your code for easy of readability and understanding.
What if I face a problem?
When you face a problem as you work on any assignment, do the following:
Create an issue on github for this assignment repository and it will be addressed by the Bongohive team
Be sure to explain your issue well with possible screenshots and a way to reproduce the problem you are facing.
Restrictions
We encourage you to take the assignment seriously and you are free to search the Internet for any articles, tutorials or videos that can help you understand and solve these assignments.
How about deadlines?
You need to submit your assignment before the deadline, any submission after the deadline will not be considered.
When I’m done, what is next?
You will be guided on the next phase of this internship program once you have successfully submitted the assignments.
Prerequisites
You will need to have some basic github knowledge and github account for you to be able to do these assignments. Read up on how to:
This is the api service of batnoter application built with golang.
It exposes ReST endpoints to access and manage markdown notes from user’s git repository. Currently it only supports github repository for storing & managing notes.
Local Development Setup
Prerequisites
Go version 1.18 or above
Docker Desktop
Start postgres database container
Below commands use docker to start the database container.
make network
make postgres
make createdb
Create configuration file from template
The config.yaml is the configuration template file containing default config values.
cp config.yaml .config.yaml
Application uses .config.yaml file to get the config values. Please update placeholder-values from this config file to the actual ones.
Start the server
Make sure that the .config.yaml file is configured correctly & database container is up & running.
Then run the below commands to setup the db schema and start the web server.
go run main.go migrateup
go run main.go serve
This will start the server on port specified in .config.yaml file. You can now access the api endpoints.
Run tests
go test -v -cover ./...
This will execute all the tests and also prints the code coverage percentage.
Welcome to SeedGn, your go-to mnemonic seed phrase generator! SeedGn is a powerful tool designed to generate seed phrases and check balances for various networks such as Bitcoin (Btc), Ethereum (Eth), Solana (Sol), and TON. With SeedGn, you can automatically generate seed phrases and check balances, making it easier to manage your crypto assets securely.
Features
Mnemonic Seed Phrase Generation: Easily create mnemonic seed phrases for your crypto wallets.
Balance Checking: Check the balance of wallets for multiple networks.
It is also possible to blend with your favorite videos.
sample6.mp4
sample 3 auto tagging
left : original
center : apply the same prompts in all keyframes
right : apply auto tagging by deepdanbooru in all keyframes
This function improves the detailed changes in facial expressions, hand expressions, etc.
In the sample video, the “closed_eyes” and “hands_on_own_face” tags have been added to better represent eye blinks and hands brought in front of the face.
sample_autotag.mp4
sample 4 auto tagging (apply lora dynamically)
left : apply auto tagging by deepdanbooru in all keyframes
right : apply auto tagging by deepdanbooru in all keyframes + apply “anyahehface” lora dynamically
Added the function to dynamically apply TI, hypernet, Lora, and additional prompts according to automatically attached tags.
In the sample video, if the “smile” tag is given, the lora and lora trigger keywords are set to be added according to the strength of the “smile” tag.
Also, since automatically added tags are sometimes incorrect, unnecessary tags are listed in the blacklist. Here is the actual configuration file used. placed in “Project directory” for use.
Use the Extensions tab of the webui to [Install from URL]
Usage
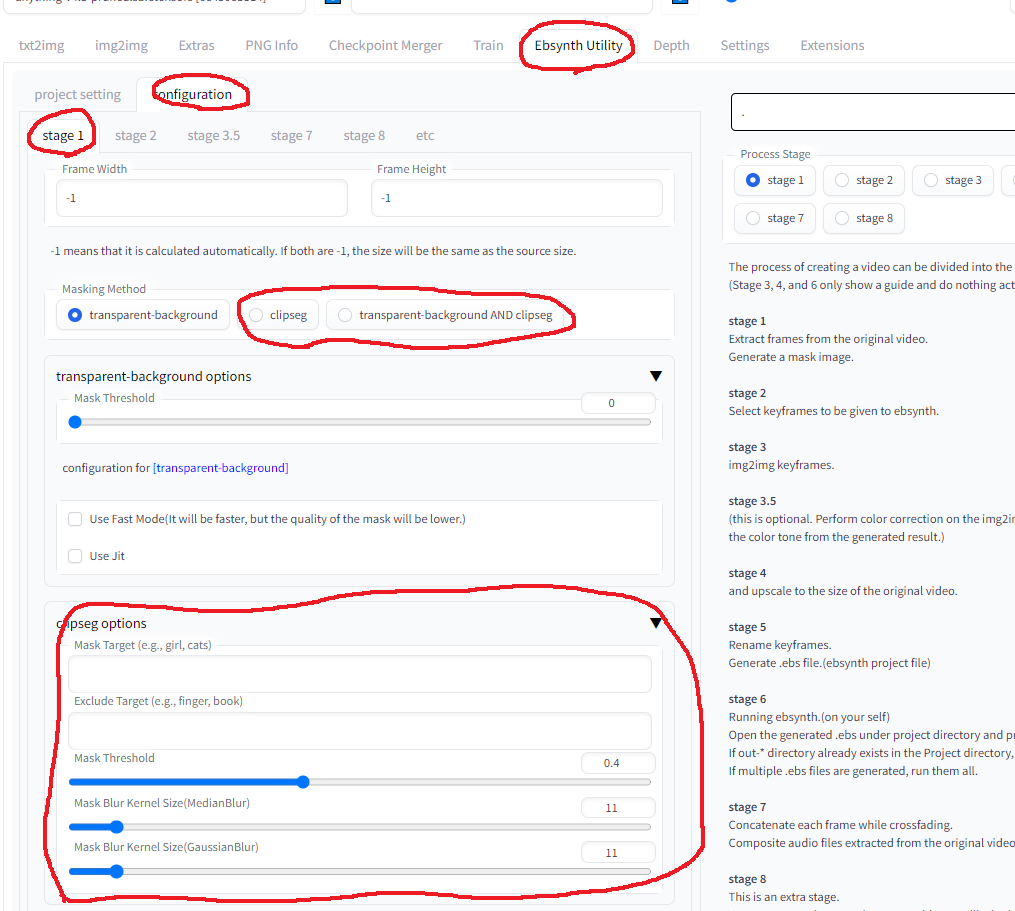
Go to [Ebsynth Utility] tab.
Create an empty directory somewhere, and fill in the “Project directory” field.
Place the video you want to edit from somewhere, and fill in the “Original Movie Path” field.
Use short videos of a few seconds at first.
Select stage 1 and Generate.
Execute in order from stage 1 to 7.
Progress during the process is not reflected in webui, so please check the console screen.
If you see “completed.” in webui, it is completed.
(In the current latest webui, it seems to cause an error if you do not drop the image on the main screen of img2img.
Please drop the image as it does not affect the result.)
Note 1
For reference, here’s what I did when I edited a 1280×720 30fps 15sec video based on
Stage 1
There is nothing to configure.
All frames of the video and mask images for all frames are generated.
Stage 2
In the implementation of this extension, the keyframe interval is chosen to be shorter where there is a lot of motion and longer where there is little motion.
If the animation breaks up, increase the keyframe, if it flickers, decrease the keyframe.
First, generate one time with the default settings and go straight ahead without worrying about the result.
Stage 3
Select one of the keyframes, throw it to img2img, and run [Interrogate DeepBooru].
Delete unwanted words such as blur from the displayed prompt.
Fill in the rest of the settings as you would normally do for image generation.
Here is the settings I used.
Sampling method : Euler a
Sampling Steps : 50
Width : 960
Height : 512
CFG Scale : 20
Denoising strength : 0.2
Here is the settings for extension.
Mask Mode(Override img2img Mask mode) : Normal
Img2Img Repeat Count (Loop Back) : 5
Add N to seed when repeating : 1
use Face Crop img2img : True
Face Detection Method : YuNet
Max Crop Size : 1024
Face Denoising Strength : 0.25
Face Area Magnification : 1.5 (The larger the number, the closer to the model’s painting style, but the more likely it is to shift when merged with the body.)
Enable Face Prompt : False
Trial and error in this process is the most time-consuming part.
Monitor the destination folder and if you do not like results, interrupt and change the settings.
[Prompt][Denoising strength] and [Face Denoising Strength] settings when using Face Crop img2img will greatly affect the result.
For more information on Face Crop img2img, check here
If you have lots of memory to spare, increasing the width and height values while maintaining the aspect ratio may greatly improve results.
The information above is from a time when there was no controlnet.
When controlnet are used together (especially multi-controlnets),
Even setting “Denoising strength” to a high value works well, and even setting it to 1.0 produces meaningful results.
If “Denoising strength” is set to a high value, “Loop Back” can be set to 1.
Stage 4
Scale it up or down and process it to exactly the same size as the original video.
This process should only need to be done once.
Width : 1280
Height : 720
Upscaler 1 : R-ESRGAN 4x+
Upscaler 2 : R-ESRGAN 4x+ Anime6B
Upscaler 2 visibility : 0.5
GFPGAN visibility : 1
CodeFormer visibility : 0
CodeFormer weight : 0
Stage 5
There is nothing to configure.
.ebs file will be generated.
Stage 6
Run the .ebs file.
I wouldn’t change the settings, but you could adjust the .ebs settings.
Stage 7
Finally, output the video.
In my case, the entire process from 1 to 7 took about 30 minutes.
Crossfade blend rate : 1.0
Export type : mp4
Note 2 : How to use multi-controlnet together
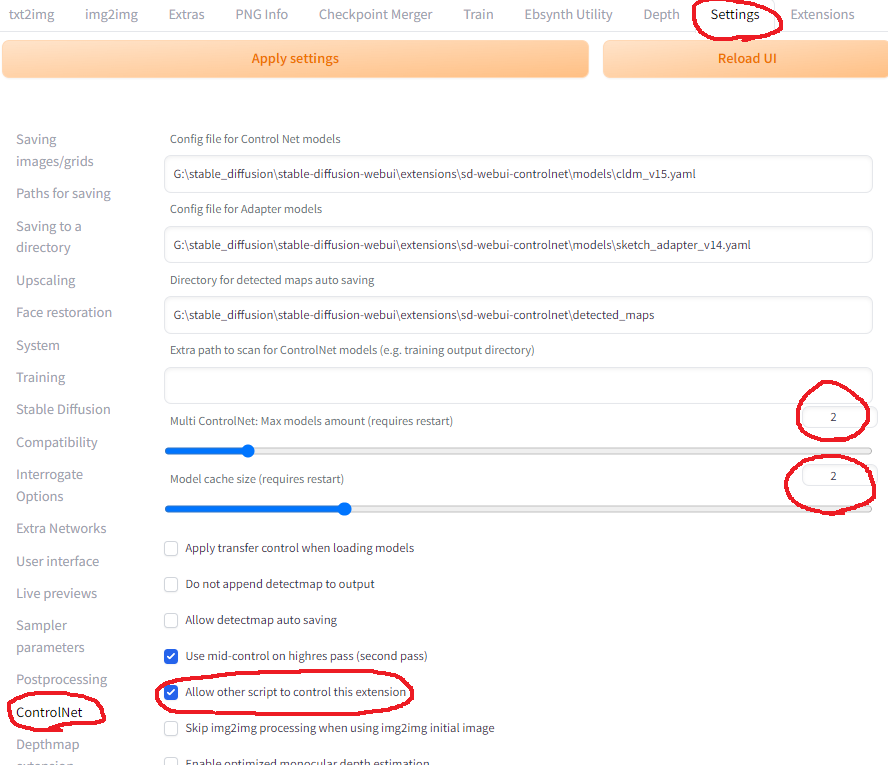
in webui setting
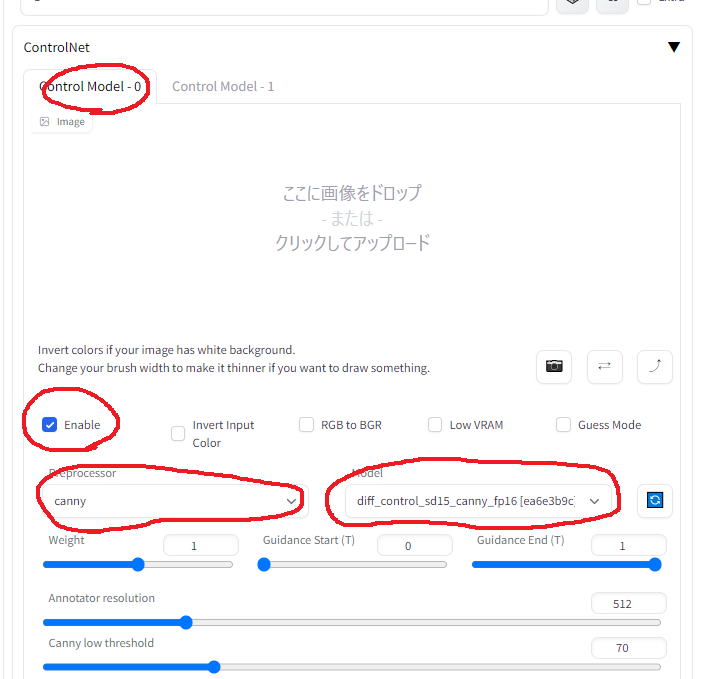
In controlnet settings in img2img tab(for controlnet 0)
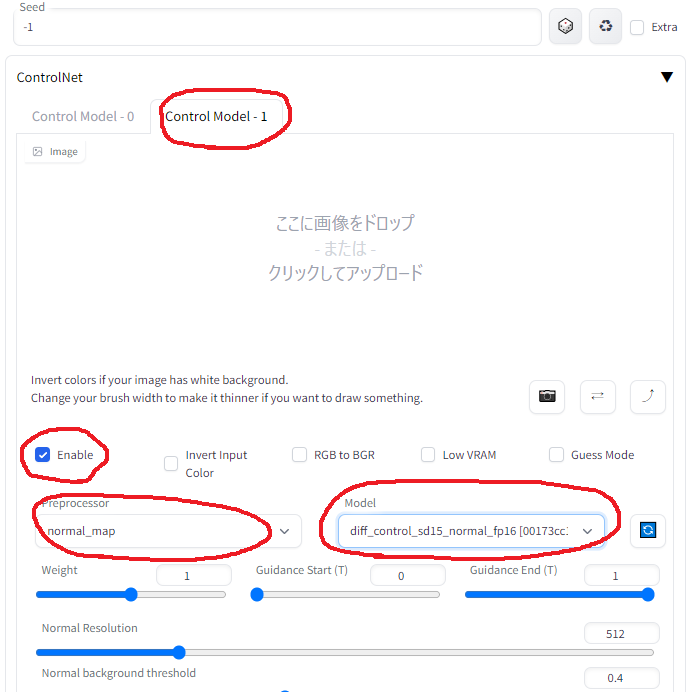
In controlnet settings in img2img tab(for controlnet 1)
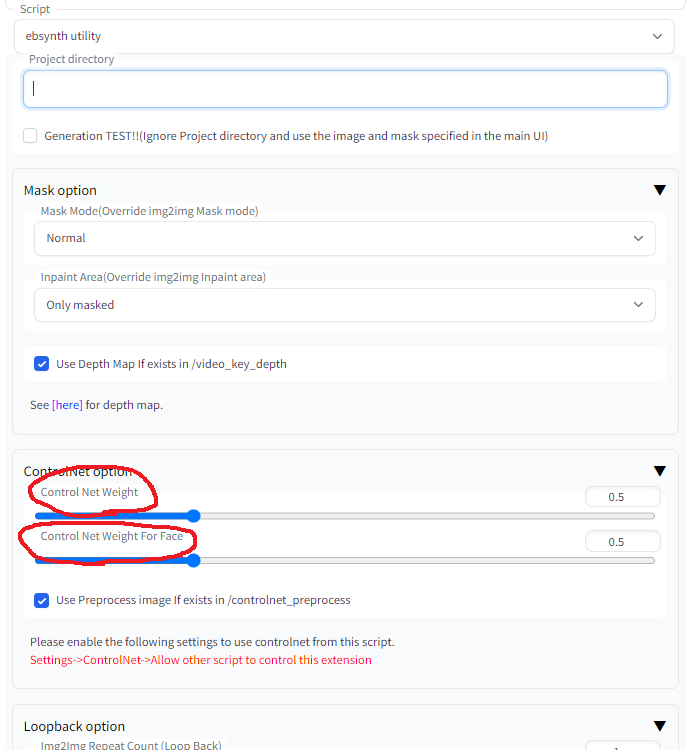
In ebsynth_utility settings in img2img tab
Warning : “Weight” in the controlnet settings is overridden by the following values
It is also possible to blend with your favorite videos.
sample6.mp4
sample 3 auto tagging
left : original
center : apply the same prompts in all keyframes
right : apply auto tagging by deepdanbooru in all keyframes
This function improves the detailed changes in facial expressions, hand expressions, etc.
In the sample video, the “closed_eyes” and “hands_on_own_face” tags have been added to better represent eye blinks and hands brought in front of the face.
sample_autotag.mp4
sample 4 auto tagging (apply lora dynamically)
left : apply auto tagging by deepdanbooru in all keyframes
right : apply auto tagging by deepdanbooru in all keyframes + apply “anyahehface” lora dynamically
Added the function to dynamically apply TI, hypernet, Lora, and additional prompts according to automatically attached tags.
In the sample video, if the “smile” tag is given, the lora and lora trigger keywords are set to be added according to the strength of the “smile” tag.
Also, since automatically added tags are sometimes incorrect, unnecessary tags are listed in the blacklist. Here is the actual configuration file used. placed in “Project directory” for use.
Use the Extensions tab of the webui to [Install from URL]
Usage
Go to [Ebsynth Utility] tab.
Create an empty directory somewhere, and fill in the “Project directory” field.
Place the video you want to edit from somewhere, and fill in the “Original Movie Path” field.
Use short videos of a few seconds at first.
Select stage 1 and Generate.
Execute in order from stage 1 to 7.
Progress during the process is not reflected in webui, so please check the console screen.
If you see “completed.” in webui, it is completed.
(In the current latest webui, it seems to cause an error if you do not drop the image on the main screen of img2img.
Please drop the image as it does not affect the result.)
Note 1
For reference, here’s what I did when I edited a 1280×720 30fps 15sec video based on
Stage 1
There is nothing to configure.
All frames of the video and mask images for all frames are generated.
Stage 2
In the implementation of this extension, the keyframe interval is chosen to be shorter where there is a lot of motion and longer where there is little motion.
If the animation breaks up, increase the keyframe, if it flickers, decrease the keyframe.
First, generate one time with the default settings and go straight ahead without worrying about the result.
Stage 3
Select one of the keyframes, throw it to img2img, and run [Interrogate DeepBooru].
Delete unwanted words such as blur from the displayed prompt.
Fill in the rest of the settings as you would normally do for image generation.
Here is the settings I used.
Sampling method : Euler a
Sampling Steps : 50
Width : 960
Height : 512
CFG Scale : 20
Denoising strength : 0.2
Here is the settings for extension.
Mask Mode(Override img2img Mask mode) : Normal
Img2Img Repeat Count (Loop Back) : 5
Add N to seed when repeating : 1
use Face Crop img2img : True
Face Detection Method : YuNet
Max Crop Size : 1024
Face Denoising Strength : 0.25
Face Area Magnification : 1.5 (The larger the number, the closer to the model’s painting style, but the more likely it is to shift when merged with the body.)
Enable Face Prompt : False
Trial and error in this process is the most time-consuming part.
Monitor the destination folder and if you do not like results, interrupt and change the settings.
[Prompt][Denoising strength] and [Face Denoising Strength] settings when using Face Crop img2img will greatly affect the result.
For more information on Face Crop img2img, check here
If you have lots of memory to spare, increasing the width and height values while maintaining the aspect ratio may greatly improve results.
The information above is from a time when there was no controlnet.
When controlnet are used together (especially multi-controlnets),
Even setting “Denoising strength” to a high value works well, and even setting it to 1.0 produces meaningful results.
If “Denoising strength” is set to a high value, “Loop Back” can be set to 1.
Stage 4
Scale it up or down and process it to exactly the same size as the original video.
This process should only need to be done once.
Width : 1280
Height : 720
Upscaler 1 : R-ESRGAN 4x+
Upscaler 2 : R-ESRGAN 4x+ Anime6B
Upscaler 2 visibility : 0.5
GFPGAN visibility : 1
CodeFormer visibility : 0
CodeFormer weight : 0
Stage 5
There is nothing to configure.
.ebs file will be generated.
Stage 6
Run the .ebs file.
I wouldn’t change the settings, but you could adjust the .ebs settings.
Stage 7
Finally, output the video.
In my case, the entire process from 1 to 7 took about 30 minutes.
Crossfade blend rate : 1.0
Export type : mp4
Note 2 : How to use multi-controlnet together
in webui setting
In controlnet settings in img2img tab(for controlnet 0)
In controlnet settings in img2img tab(for controlnet 1)
In ebsynth_utility settings in img2img tab
Warning : “Weight” in the controlnet settings is overridden by the following values
A type-safe fluent assertion library written in TypeScript and inspired by Jest assertions and the popular AssertJ.
This library is designed to work in Node.js. It ships with a rich set of expressive and flexible matchers that allows chaining multiple assertions. Assertive.ts is framework agnostic and should be used with a test framework such as Jest, Mocha, or Ava.
🚨 BREAKING CHANGES: Since v2, the @stackbuilders/assertive-ts package has been renamed to @assertive-ts/core so we can group other packages, such as plugins, into the same namespace. Check the packages section for more info.
Type-safe library
A distinctive feature of Assertive.ts with other assertion libraries is that it leverages the TypeScript compiler to avoid type coercions and mismatches. It also infers the static type of the value you want to assert and provides you with intelligent matcher completion and signature help so that you can write code more quickly and correctly.
Features
Type safety and intelligent matcher completion
Rich set of expressive and flexible matchers
Concise, chainable interface inspired by AssertJ
Works with any test runner and framework such as Jest, Mocha, or Ava
Well tested: more than 300 tests!
Packages
For convenience, this library is split into packages grouped within the same namespace:
assertive-ts/core: Core functionalities, assertions applicable for any kind of application. This package is required for the extension mechanism (plugins). This package replaces the deprecated stackbuilders/assertive-ts package.
Using you favorite test runner, you just need to import the expect and test away! If you don’t really agree with expect as the name of the assertion function, we provide a couple aliases, such as assert and assertThat.
import{expect}from"@assertive-ts/core";describe("sum",()=>{it("returns the sum of two numbers",()=>{constresult=sum(3,2);expect(result).toBeEqual(5);});});
To assert the opposite, you can simply use the .not modifier before the matcher:
expect(sum(1,2)).not.toBeNull();
This library provides fluent assertions, which means you can chain multiple matcher functions to the same value under test:
expect("assertive-ts is awesome!").toStartWith("assertive-ts").not.toContain("unsafe").toEndWith("awesome!");
The matcher functions depend on the type of the value on the expect. If you’re using TypeScript, the compiler will let you know if something is not available for that assertion:
// Boolean assertionexpect(isEven(2)).toBeTrue();// String assertionexpect("foobar").toStartWith("foo");// Number assertionexpect(sum(1,2)).toBePositive();// Error assertionexpect(newError(errorMessage)).toHaveMessage(expectedError);// Array assertionconstdata=[1,2,3,4]expect(data).toMatchAll(x=>x<5);expect(data).toBeEmpty()// Date assertionconstdate=newDate(2023,12,31);expect(date).toBeAfter(newDate(2023,12,1));expect(date).toBeBefore(newDate(2024,1,1));// Object assertionconstobjectData={key1: "test1",key2: "test2",};expect(objectData).toContainKey("key1");expect(objectData).toContainEntry(["key1","test1"]);expect(14).toEndWith("4");^ ? type error: `toEndWith`doesnotexistin`NumberAssertion`
You can also assert over functions and asynchronous code, for example:
functionverifyEnvVar(): void{const{MY_ENV_VAR}=process.env;if(!MY_ENV_VAR){thrownewError("Missing MY_ENV_VAR environment variable");}};// assertionexpect(()=>verifyEnvVar()).toThrowError(Error).toHaveMessage("Missing MY_ENV_VAR environment variable");expect(()=>verifyEnvVar()).not.toThrow();asyncfunctiongetData(): Promise<DataType>{constdata=awaitrequestApi();if(!data){thrownewError("Data was not found");}returndata;}// assertionawaitexpect(getData()).toBeRejected();awaitexpect(getData()).toBeResolved();
For a list of all Core matchers and extended documentation, you can refer to the Core API documentation.
Test Runner Integration
Assertive.ts works on any JavaScript test runner, in the Node.js environments. Below you can find some example of how to use it on some of the most common test runners:
Do you want to contribute to this project? Please take a look at our contributing guidelines to know how you can help us build it. You can also check the development guide for information about local setup and the release process.
This docker-compose setup provides a comprehensive environment for running Cardano related services. Below is a brief overview of the services and instructions on how to operate them.
Services
cardano-node: This is the main Cardano node service. It connects to the Cardano network specified by the NETWORK environment variable. By default, it connects to the mainnet.
cardano-node-api: This service is responsible for interfacing with local Cardano node. It depends on the cardano-node service to be healthy before starting.
bursa: This service is programatic wallet. It runs without any persistence.
ogmios: This service is a lightweight bridge interface for cardano-node. It provides an HTTP / WebSocket API that enables applications to interact with a local cardano-node via JSON+RPC-2.0. It depends on the cardano-node service to be healthy before starting.
tx-submit-api: This service is responsible for submitting transactions to the Cardano network. It depends on the cardano-node service to be healthy before starting.
cardano-db-sync: This service syncs the Cardano blockchain data to a PostgreSQL database. It depends on both the cardano-node and postgres services to be healthy before starting.
postgres: This is the PostgreSQL database service used by the cardano-db-sync service to store the Cardano blockchain data.
How to Start Services
Because each service has defined dependency that means starting a service will also start it’s dependencies.
Using Profiles in Docker Compose
With profiles, you can selectively start services based on different needs or environments.
Below are examples of how to use profiles in this setup.
Start Just the Cardano Node
To start only the cardano-node service, which is part of the node profile, run:
docker compose --profile node up
Start Cardano Node and cardano-node-api
To start both the cardano-node and cardano-node-api use node-api profile, run:
docker compose --profile node-api up
Start Cardano Node and tx-submit-api
To start both the cardano-node and tx-submit-api use tx-submit-api profile, run:
docker compose --profile tx-submit-api up
Start Cardano Node and db-sync
To start both the cardano-node and cardano-db-sync use db-sync profile, run:
docker compose --profile db-sync up
Start All Services in Detached Mode
To start all services defined in the docker-compose.yml file in detached mode, run:
docker compose up -d
This command will start all services (e.g., cardano-node, tx-submit-api, cardano-db-sync, and postgres) in the background, regardless of profiles.
If you need to stop the services later, use:
docker compose down
This will stop and remove all the services started with docker compose up.
If you’ve started specific services using profiles and want to stop them, you can specify the same profiles in the down command.
How to Use Bursa
To start just the bursa service, which is part of the bursa profile, run:
docker compose --profile bursa up
Access Swagger UI:
Open your web browser and navigate to the Swagger UI:
In the Swagger UI, find the section for creating a new wallet.
Click on the Get/api/v1/wallet/create operation.
Choose Try it out.
Click Execute.
This will send a create request to Bursa, and you should receive a JSON response with the details of the newly created wallet.
Store the mnemonic in a safe place. If you want to restore the wallet, you will need the mnemonic. If you lose the mnemonic, you will lose access to the wallet.
How to Use Bluefin
To start just the bluefin service, which is part of the bluefin profile, run:
docker compose --profile bluefin up
to start the bluefin-inspector service, which is part of the bluefin-inspector profile, run:
docker compose --profile bluefin-inspector up
to start both the bluefin and bluefin-inspector services, use bluefin and bluefin-inspector profile, run:
docker compose --profile bluefin --profile bluefin-inspector up
to see the seed phrase of the wallet created by bluefin, run:
docker exec bluefin-inspector cat /data/seed.txt
Bluefin-inspector is a service that will allow you to see the seed phrase of the wallet created by bluefin.
Seed phrase will be stored and managed on the local filesystem of the Docker host.
The bluefin-inspector is setup to run for an 1h. After that, it will stop automatically.
You can restart it by running the command below.
docker compose --profile bluefin-inspector up -d --force-recreate
How to Use Cardano Wallet
To start just the cardano-wallet service, which is part of the wallet profile, run: