💻 Access to Front end here |
🖥 Access to Back end here |
💡 About the project
Project created at the Next Level Week, promoted by Rocket Seat, the initial project was called Proffy and the aim was to create a platform for students to find teachers for a variety of subjects.
In my project I made Musify, with the specific goal of connecting instruments teachers and students.
The original design provided by RocketSeat was changed to follow the Spotify color pallete.
🚀 Programming Languages
ReactJS
TypeScript
HTML5 e CSS3
NodeJS
📥 How to Run this project on your PC
Clone the web repo: git clone https://github.com/flavioccf/nlw2-web.git
Clone the server repo: git clone https://github.com/flavioccf/nlw2-server.git
In both projects you need to go to the folder and run:
Dependencies installation: yarn install
Run application: yarn start
The server repo has both SQLite and PostgreSQL configs, those are split in two different branches.
Asynchronous Python client for the Twente Milieu API.
About
This package allows you to request waste pickup days from Twente Milieu
programmatically. It is mainly created to allow third-party programs to use
or respond to this data.
An excellent example of this might be Home Assistant, which allows you to write
automations, e.g., play a Google Home announcement in the morning when it is
trash pickup day.
Installation
pip install twentemilieu
Usage
importasynciofromtwentemilieuimportTwenteMilieu, WasteTypeasyncdefmain() ->None:
"""Show example on stats from Twente Milieu."""asyncwithTwenteMilieu(post_code="1234AB", house_number=1) astwente:
unique_id=awaittwente.unique_id()
print("Unique Address ID:", unique_id)
pickups=awaittwente.update()
print("Next pickup for Non-recyclable:", pickup.get(WasteType.NON_RECYCLABLE))
if__name__=="__main__":
asyncio.run(main())
Releases are based on Semantic Versioning, and use the format
of MAJOR.MINOR.PATCH. In a nutshell, the version will be incremented
based on the following:
MAJOR: Incompatible or major changes.
MINOR: Backwards-compatible new features and enhancements.
PATCH: Backwards-compatible bugfixes and package updates.
Contributing
This is an active open-source project. We are always open to people who want to
use the code or contribute to it.
To install all packages, including all development requirements:
npm install
poetry install
As this repository uses the pre-commit framework, all changes
are linted and tested with each commit. You can run all checks and tests
manually, using the following command:
poetry run pre-commit run --all-files
To run just the Python tests:
poetry run pytest
Authors & contributors
The original setup of this repository is by Franck Nijhof.
Permission is hereby granted, free of charge, to any person obtaining a copy
of this software and associated documentation files (the “Software”), to deal
in the Software without restriction, including without limitation the rights
to use, copy, modify, merge, publish, distribute, sublicense, and/or sell
copies of the Software, and to permit persons to whom the Software is
furnished to do so, subject to the following conditions:
The above copyright notice and this permission notice shall be included in all
copies or substantial portions of the Software.
THE SOFTWARE IS PROVIDED “AS IS”, WITHOUT WARRANTY OF ANY KIND, EXPRESS OR
IMPLIED, INCLUDING BUT NOT LIMITED TO THE WARRANTIES OF MERCHANTABILITY,
FITNESS FOR A PARTICULAR PURPOSE AND NONINFRINGEMENT. IN NO EVENT SHALL THE
AUTHORS OR COPYRIGHT HOLDERS BE LIABLE FOR ANY CLAIM, DAMAGES OR OTHER
LIABILITY, WHETHER IN AN ACTION OF CONTRACT, TORT OR OTHERWISE, ARISING FROM,
OUT OF OR IN CONNECTION WITH THE SOFTWARE OR THE USE OR OTHER DEALINGS IN THE
SOFTWARE.
90sify is the ultimate time machine for your browsing experience! With just one click, transform any modern website into a pixelated, retro masterpiece that would make any web designer from the 90s proud.
But that’s not all – we’ve also included a unique AOL search feature that will take you back to the glory days of dial-up internet. Simply highlight any text on a website and click the AOL search button to be transported to an AOL search page with your query. Talk about a blast from the past!
Features
90s web design: The extension transforms modern websites to look like they’re from the 90s with pixelated graphics and bright colors.
AOL search: Highlight any text on the website and click the AOL search button to be redirected to an AOL search page with your query.
Easy to use: Simply install the extension, activate it on any website, and start experiencing the 90s internet all over again.
Installation
Get ready to take a trip down memory lane with just a few simple steps:
Clone this repository to your local machine.
Open Google Chrome and navigate to the “Extensions” page (chrome://extensions/).
Enable “Developer mode” in the top right corner of the page.
Click “Load unpacked” and select the folder where you cloned the repository.
The extension should now be installed and ready to use.
Usage
Get ready to go back in time with just one click! To use the extension, simply activate it on any website by clicking the 90sify icon in your browser toolbar. The website will instantly be transformed to look like a 90s version of itself, complete with pixelated graphics and bright colors.
To use the AOL search feature, simply highlight any text on the website and click the AOL search button that appears. You’ll be transported back to the days of dial-up internet in no time!
Contributions
We welcome contributions from anyone who wants to help make 90sify even more awesome! If you find a bug or have a feature request, please create an issue or submit a pull request.
License
This project is licensed under the MIT License – see the LICENSE file for details.
# run all unit tests
yarn test# run all unit tests in watch mode
yarn test:watch
# run unit tests coverage
yarn test:coverage
# run all e2e tests
yarn test:e2e
# run all e2e tests in watch mode
yarn test:e2e:watch
Enviroment Variable
The environment variables can be found and modified in the .env file. They come with these default values:
In this app, ESLint is configured to follow the Airbnb JavaScript style guide with some modifications. It also extends eslint-config-prettier to turn off all rules that are unnecessary or might conflict with Prettier.
To modify the ESLint configuration, update the .eslintrc.json file. To modify the Prettier configuration, update the .prettierrc.json file.
To prevent a certain file or directory from being linted, add it to .eslintignore and .prettierignore.
To maintain a consistent coding style across different IDEs, the project contains .editorconfig
API Documentation
When running the server, you can visit at /api-docs (only dev environment)
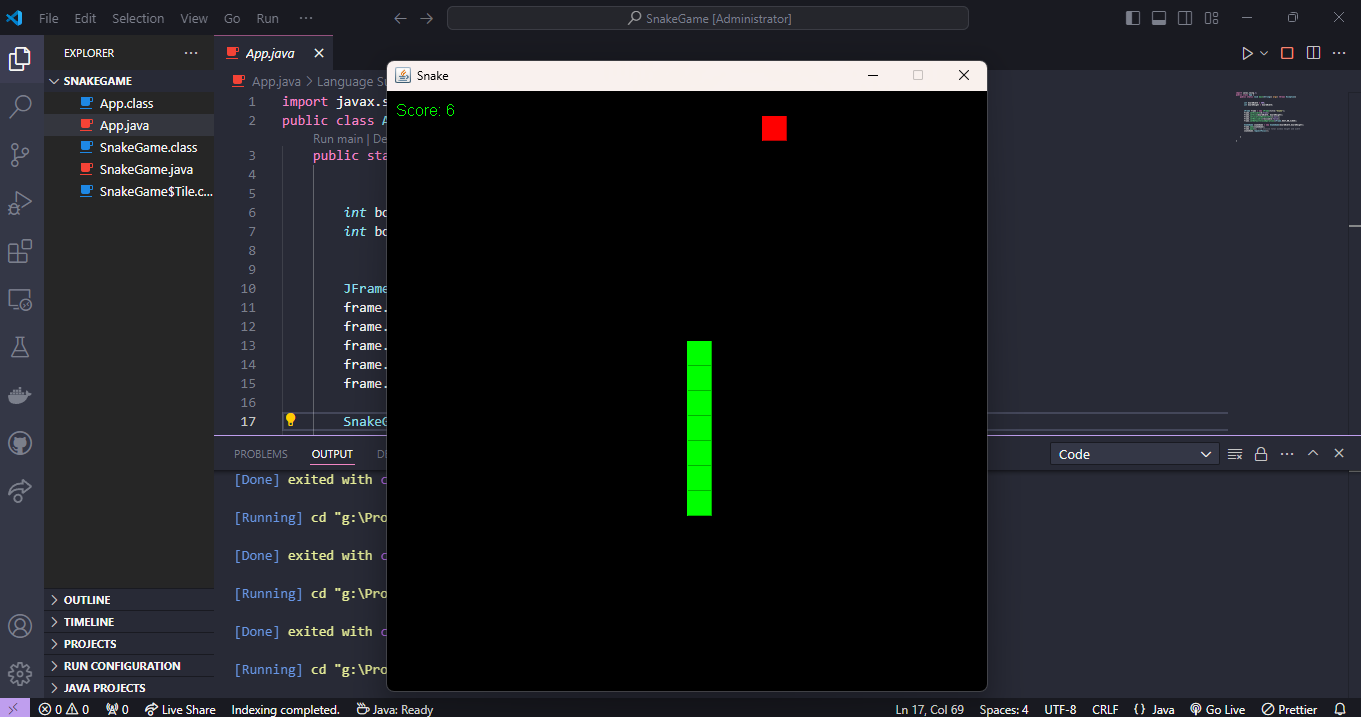
A classic Snake Game built with Java, where players control a growing snake to eat food and avoid collisions, designed with simple yet engaging gameplay.
ℹ️ About
A nostalgic recreation of the Snake Game, developed using Java and Swing, where you control the snake’s movement, aiming to eat the food while avoiding collisions with the walls or the snake’s body.
🚀 Features
🕹️ Classic Snake Game: Move the snake to eat food and grow longer.
🎨 Graphical User Interface (GUI): Simple and user-friendly design using Java Swing.
⏱️ Dynamic gameplay: The snake speeds up as it grows.
💥 Collision detection: Game ends when the snake collides with itself or the walls.
📦 Installation
1. Clone the Repository
git clone https://github.com/DikshitaDas/SnakeGame.git
cd SnakeGame
2. Compile and Run the Game
javac SnakeGame.java
java SnakeGame
🛠 Technologies Used
Technology
Logo
Java
Swing
🤝 Contributing
Contributions are welcome! Here’s how you can contribute:
Fork the repository 🍴
Create a new branch (git checkout -b feature/amazing-feature) 🚧
Commit your changes (git commit -m 'Add a new feature') 📝
Push to the branch (git push origin feature/amazing-feature) 📤
Open a pull request 📬
📄 License
This project is licensed under the MIT License. See the LICENSE file for details. 📃
Runs the app in the development mode.
Open http://localhost:3000 to view it in the browser.
The page will reload if you make edits.
You will also see any lint errors in the console.
npm test
Launches the test runner in the interactive watch mode.
See the section about running tests for more information.
npm run build
Builds the app for production to the build folder.
It correctly bundles React in production mode and optimizes the build for the best performance.
The build is minified and the filenames include the hashes.
Your app is ready to be deployed!
See the section about deployment for more information.
npm run eject
Note: this is a one-way operation. Once you eject, you can’t go back!
If you aren’t satisfied with the build tool and configuration choices, you can eject at any time. This command will remove the single build dependency from your project.
Instead, it will copy all the configuration files and the transitive dependencies (webpack, Babel, ESLint, etc) right into your project so you have full control over them. All of the commands except eject will still work, but they will point to the copied scripts so you can tweak them. At this point you’re on your own.
You don’t have to ever use eject. The curated feature set is suitable for small and middle deployments, and you shouldn’t feel obligated to use this feature. However we understand that this tool wouldn’t be useful if you couldn’t customize it when you are ready for it.
Alignment of input value, possible value: left, right, center
selectedBackgroundColor
String
#007bff
Background color of selected value. It can be HTML color name (red, green, blue) or hexa color code (#00FF00, #0000FF)
clearOption
Boolean
true
Show/Hide clear option
inputClass
String
input
Customize css class for visible element
Events
Event
Params
Description
selected
selected month in moment
A month has been selected
Build Setup
# install dependencies
npm install

# serve with hot reload at localhost:8080
npm run dev

# build for production with minification
npm run build

# run all tests
npm run test
Wireshark plugin to work with Event Tracing for Windows
Microsoft Message Analyzer is being retired and its download packages were removed from microsoft.com sites on November 25 2019.
Wireshark have built a huge library of network protocol dissectors.
The best tool for Windows would be one that can gather and mix all type of logs…
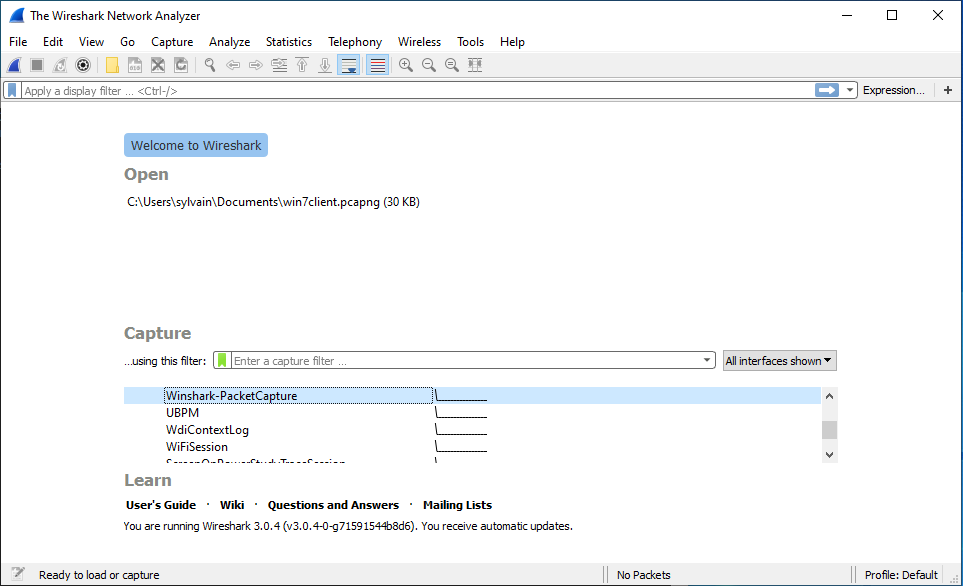
Welcome Winshark!!!
Winshark is based on a libpcap backend to capture ETW (Event tracing for Windows), and a generator that will produce all dissectors for known ETW providers on your machine.
We’ve added Tracelogging support to cover almost all log techniques on the Windows Operating System.
With Winshark and the power of Windows, we can now capture Network and Event Logs in the same tool. Windows exposes a lot of ETW providers, in particular one for network capture 😉
No more need for an external NDIS driver.
This is a huge improvement in terms of use:
Enable to mix all kind of events (system and network)
Enable to use Wireshark filtering on event log
Enable to track network and system logs by Process ID!!!
Enable to capture Windows log and network trace into an unique pcap file!!!
Capture NamedPipe through NpEtw file system filter driver
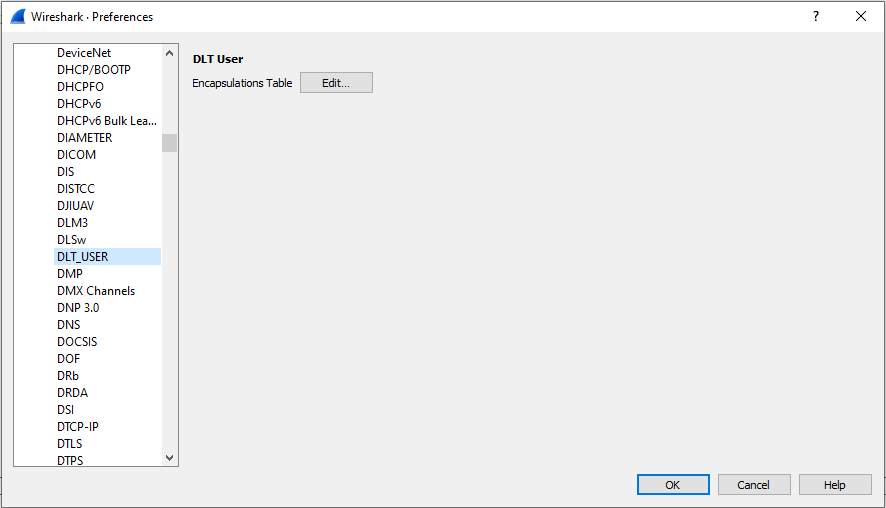
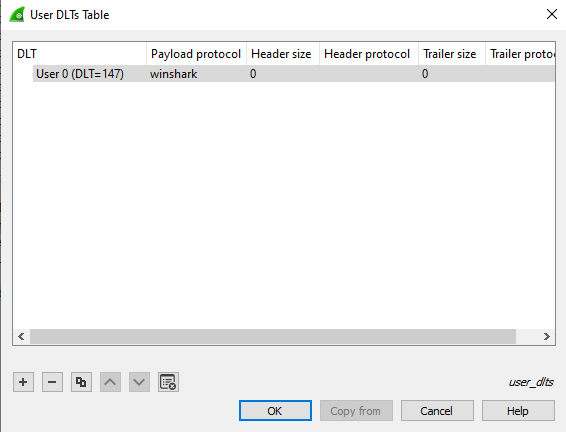
Currently, you have to ask Wireshark to interpret the DLT_USER 147 as ETW. This is because you have not yet a true value from libpcap for our new Data Link.
We issued a pull request to have a dedicated DLT value; it is still pending.
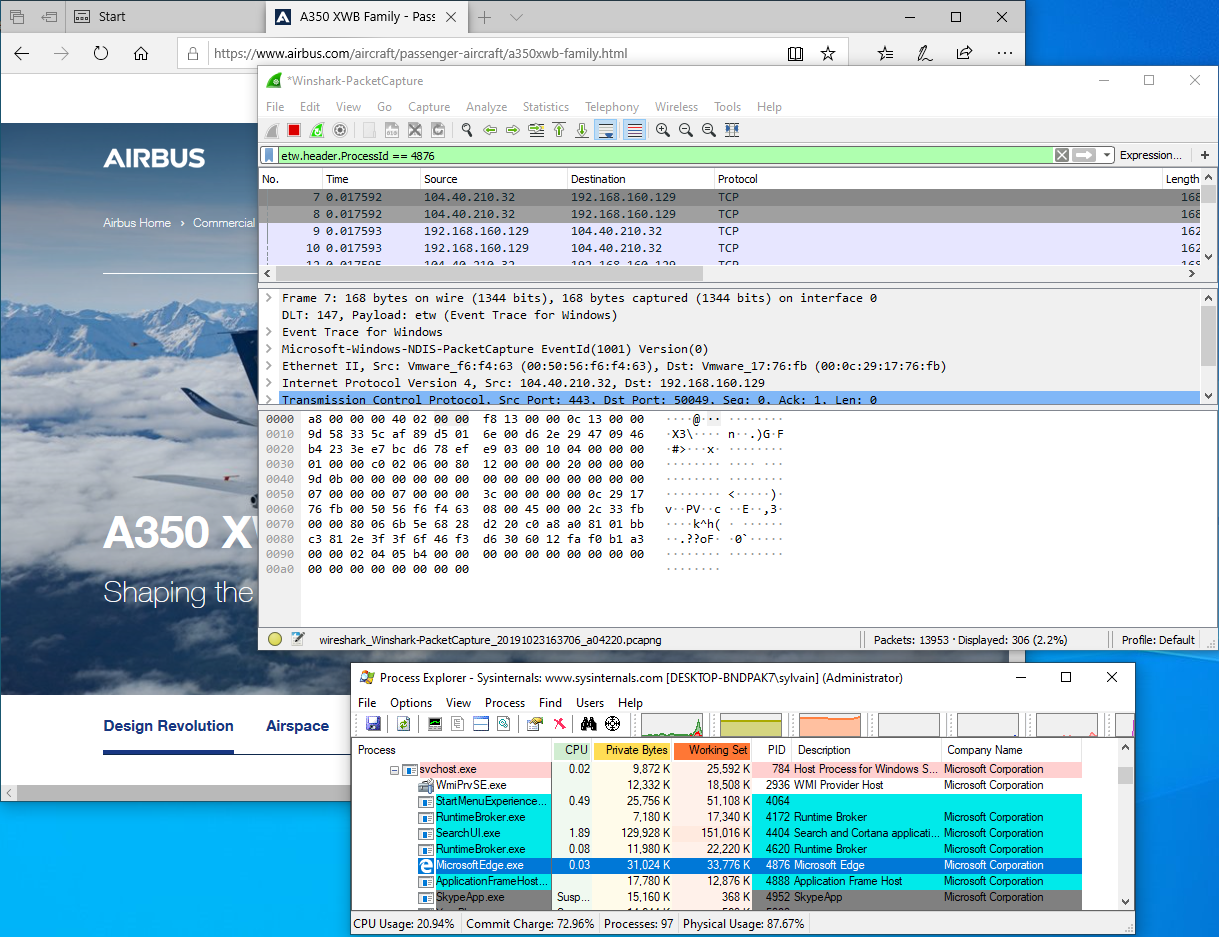
To do that you have to open Preferences tab under the Edit panel. Select DLT_USER under Protocols and Edit the encapsulations table:
To better understand how Winshark works, we need to understand how ETW works first.
ETW is splitted into three parts:
A Provider that will emit log and identified by unique ID
A Session that will mix one or more providers
A Consumer that will read logs emitted by a session
Provider
There is a lot of different kinds of providers. The most common, and usable, are registred providers. A registred provider, or a manifest-based provider, is recorded under the registry key HKLM\SOFTWARE\Microsoft\Windows\CurrentVersion\WINEVT\Publishers.
This makes the link between a provider ID and a dll. The manifest is encompassed into the associated dll into a resource name WEVT_TEMPLATE.
You can list all providers registred on your machine using logman:
logman query providers
You can also list all providers bound by a particular process:
logman query providers -pid 1234
Some of them could appears without name; these kinds of provider can produce WPP or TraceLogging logs.
Session
Sessions are created to collect logs from more than one provider.
You can create your own session using logman:
You can list all active sessions from an admin command line:
logman query -ets

Data Collector Set                      Type                          Status
-------------------------------------------------------------------------------
...
EventLog-Application                    Trace                         Running
EventLog-Microsoft-Windows-Sysmon-Operational Trace                         Running
EventLog-System                         Trace                         Running
...
The command completed successfully.
You can see here some interesting session use by the event logger to capture logs from Application and System sessions and from Sysmon.
Consumer
A consumer is a simple program that will read logs from a session. Well-known consumers are:
Event Logger
logman
netsh
tracert
And now Winshark!!! Winshark is a simple ETW consumer. The real underlying consumer is libpcap, (wpcap.dll for Windows) which is used by dumpcap.exe which is the process in charge of packet capture.
Wireshark
Wireshark is split in three parts (yes, him too):
Wireshark.exe which is in charge of parsing and dissecting protocols
dumpcap.exe which is in charge of capturing packets
libpcap (wpcap.dll) which is in charge of interfacing between dumpcap.exe and the Operating System
Winshark takes place in the first and last parts. It implements a backend for libpcap to capture ETW events.
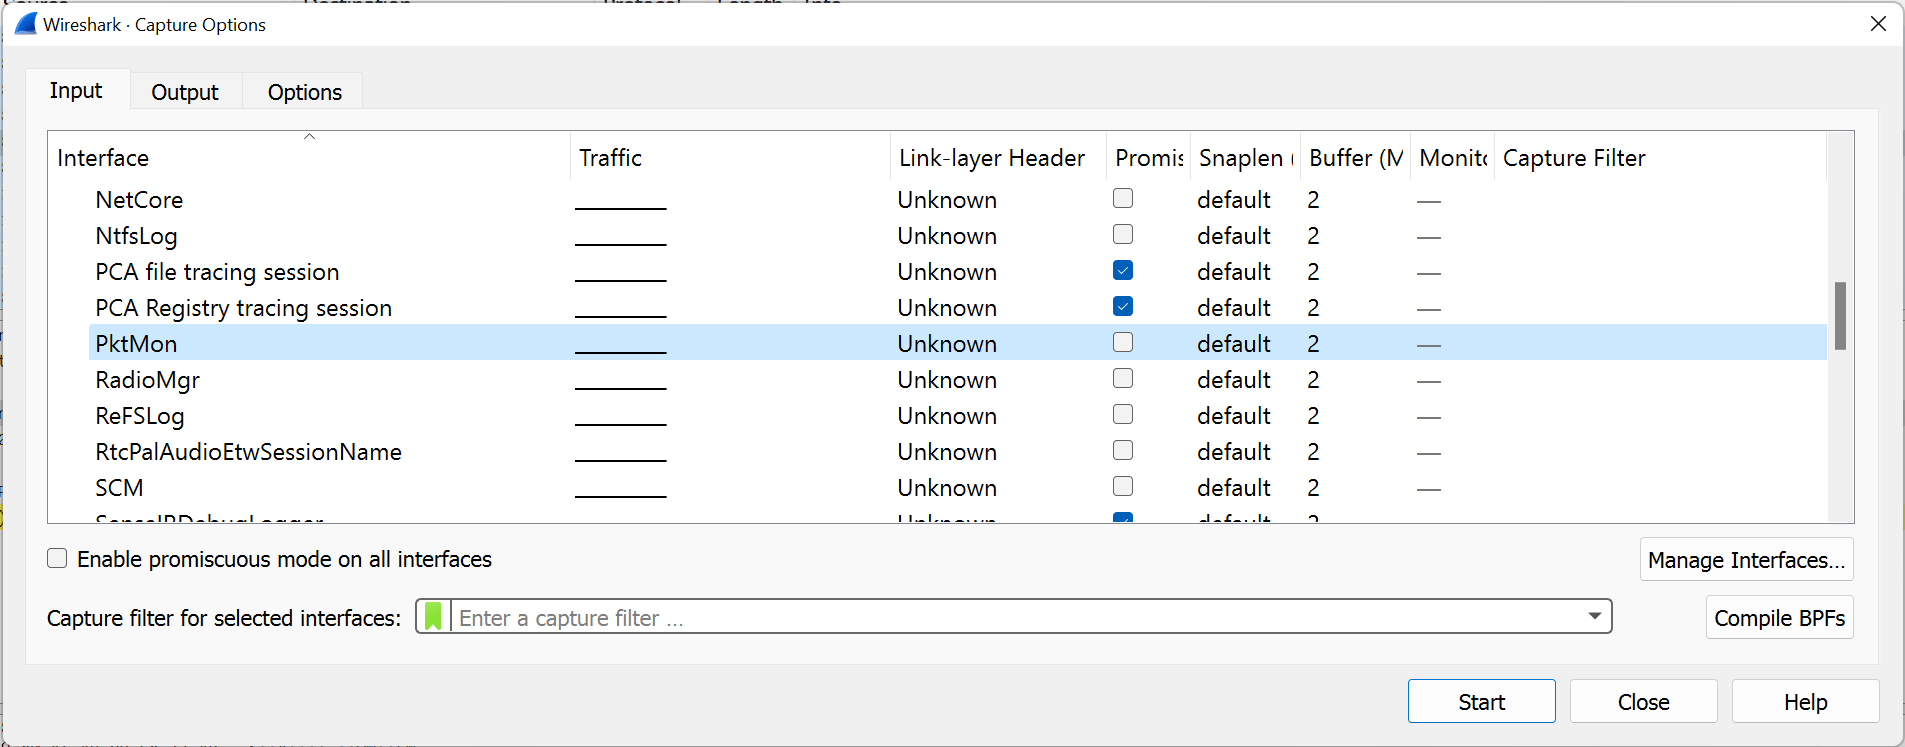
Winshark works on ETW sessions, this is why you can select an ETW session in place of Network interface at the start of capture.
Then Winshark generates lua dissectors for each manifest-based provider registred on your computer, during the installation step.
Winshark is also able to parse tracelogging-based providers.
Capture network traffic
To capture network traffic using Winshark, you can use two simple ways:
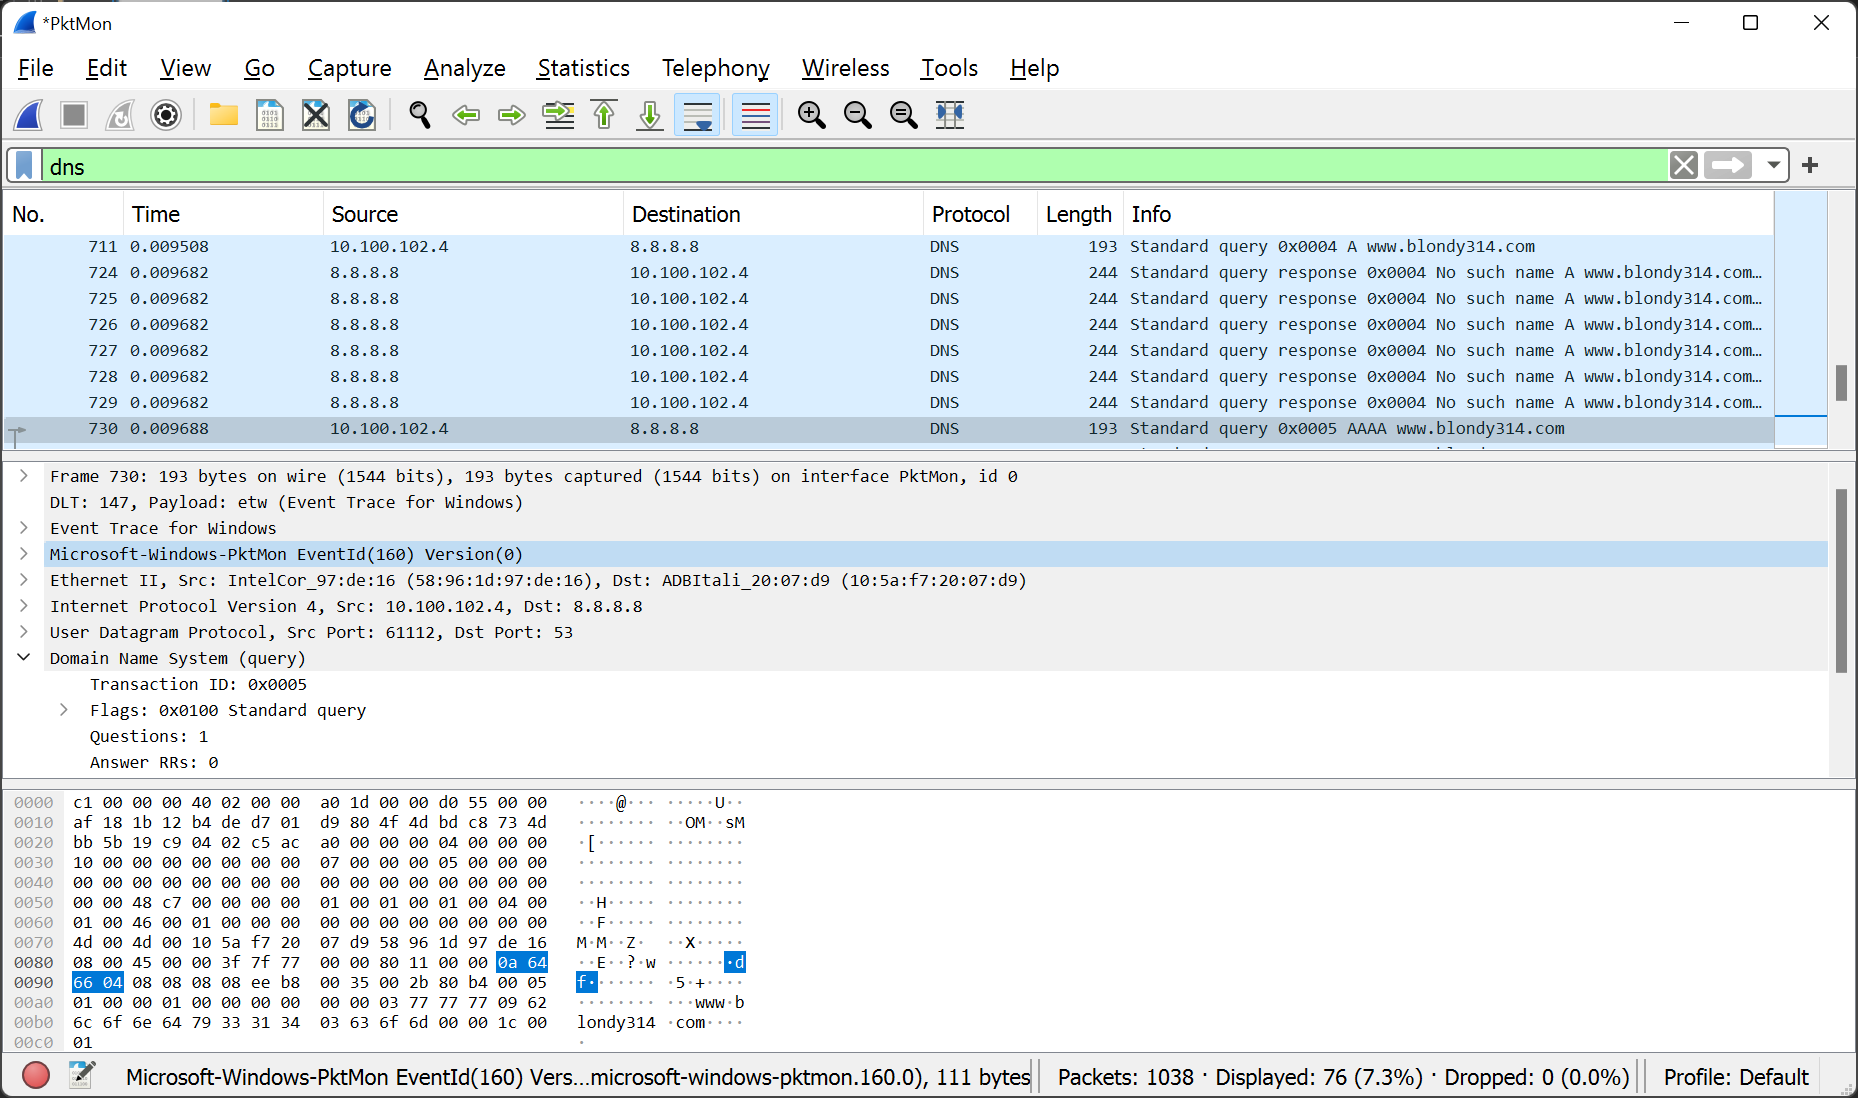
pktmon (Packet Monitor)
pktmon is an in-box, cross-component network diagnostics tool for Windows. It can be used for packet capture, packet drop detection, packet filtering and counting (supported from RS5)
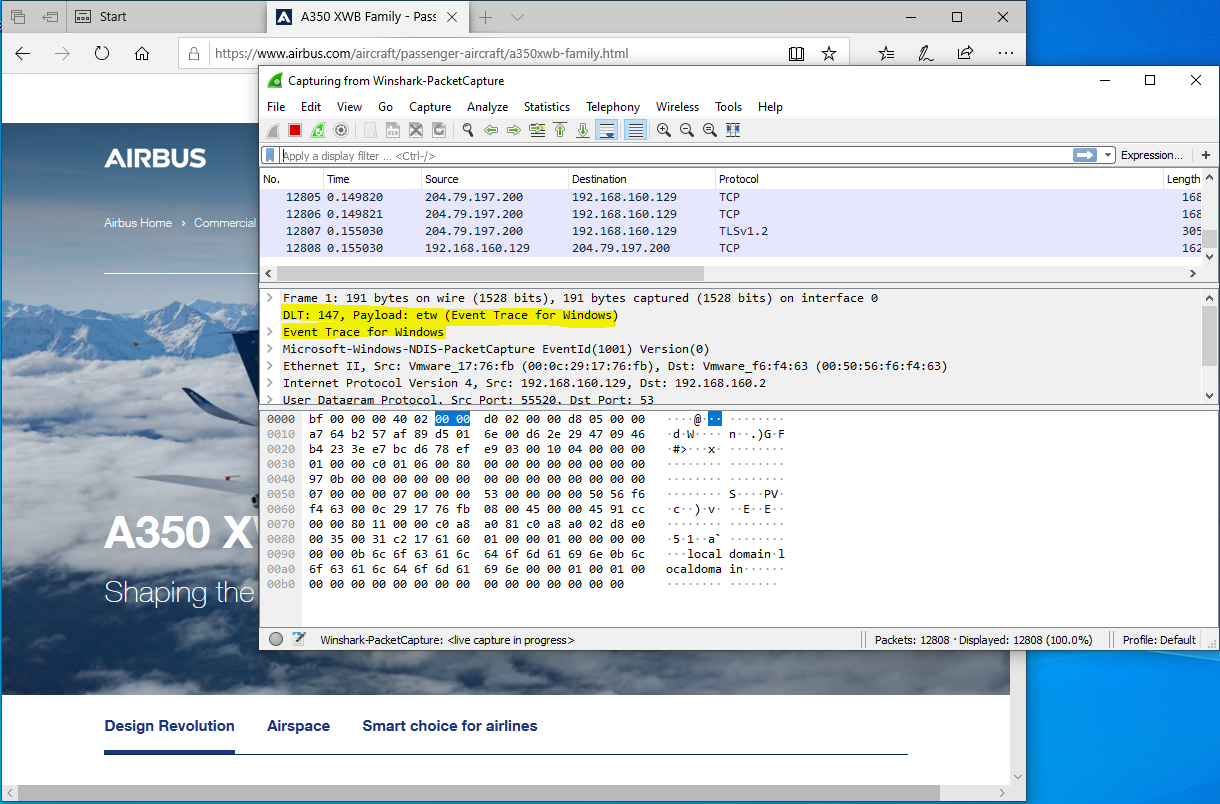
Then launch Wireshark with administrator privileges and select Winshark-PacketCapture interface:
That will start the packet capture:
Filtering on process ID
ETW marks each packet with a header that sets some metadata about the sender.
One of these is the Process ID of the emitter. This is a huge improvement from a classic packet capture from an NDIS driver.
Simply fill the filter field of Wireshark with the following expression:
winshark.header.ProcessId == 1234
Capturing NamedPipe
@kobykahane provide a file system filter driver that emit an ETW for every action perform on a NamedPipe.
Wireshark plugin to work with Event Tracing for Windows
Microsoft Message Analyzer is being retired and its download packages were removed from microsoft.com sites on November 25 2019.
Wireshark have built a huge library of network protocol dissectors.
The best tool for Windows would be one that can gather and mix all type of logs…
Welcome Winshark!!!
Winshark is based on a libpcap backend to capture ETW (Event tracing for Windows), and a generator that will produce all dissectors for known ETW providers on your machine.
We’ve added Tracelogging support to cover almost all log techniques on the Windows Operating System.
With Winshark and the power of Windows, we can now capture Network and Event Logs in the same tool. Windows exposes a lot of ETW providers, in particular one for network capture 😉
No more need for an external NDIS driver.
This is a huge improvement in terms of use:
Enable to mix all kind of events (system and network)
Enable to use Wireshark filtering on event log
Enable to track network and system logs by Process ID!!!
Enable to capture Windows log and network trace into an unique pcap file!!!
Capture NamedPipe through NpEtw file system filter driver
Currently, you have to ask Wireshark to interpret the DLT_USER 147 as ETW. This is because you have not yet a true value from libpcap for our new Data Link.
We issued a pull request to have a dedicated DLT value; it is still pending.
To do that you have to open Preferences tab under the Edit panel. Select DLT_USER under Protocols and Edit the encapsulations table:
To better understand how Winshark works, we need to understand how ETW works first.
ETW is splitted into three parts:
A Provider that will emit log and identified by unique ID
A Session that will mix one or more providers
A Consumer that will read logs emitted by a session
Provider
There is a lot of different kinds of providers. The most common, and usable, are registred providers. A registred provider, or a manifest-based provider, is recorded under the registry key HKLM\SOFTWARE\Microsoft\Windows\CurrentVersion\WINEVT\Publishers.
This makes the link between a provider ID and a dll. The manifest is encompassed into the associated dll into a resource name WEVT_TEMPLATE.
You can list all providers registred on your machine using logman:
logman query providers
You can also list all providers bound by a particular process:
logman query providers -pid 1234
Some of them could appears without name; these kinds of provider can produce WPP or TraceLogging logs.
Session
Sessions are created to collect logs from more than one provider.
You can create your own session using logman:
You can list all active sessions from an admin command line:
logman query -ets

Data Collector Set                      Type                          Status
-------------------------------------------------------------------------------
...
EventLog-Application                    Trace                         Running
EventLog-Microsoft-Windows-Sysmon-Operational Trace                         Running
EventLog-System                         Trace                         Running
...
The command completed successfully.
You can see here some interesting session use by the event logger to capture logs from Application and System sessions and from Sysmon.
Consumer
A consumer is a simple program that will read logs from a session. Well-known consumers are:
Event Logger
logman
netsh
tracert
And now Winshark!!! Winshark is a simple ETW consumer. The real underlying consumer is libpcap, (wpcap.dll for Windows) which is used by dumpcap.exe which is the process in charge of packet capture.
Wireshark
Wireshark is split in three parts (yes, him too):
Wireshark.exe which is in charge of parsing and dissecting protocols
dumpcap.exe which is in charge of capturing packets
libpcap (wpcap.dll) which is in charge of interfacing between dumpcap.exe and the Operating System
Winshark takes place in the first and last parts. It implements a backend for libpcap to capture ETW events.
Winshark works on ETW sessions, this is why you can select an ETW session in place of Network interface at the start of capture.
Then Winshark generates lua dissectors for each manifest-based provider registred on your computer, during the installation step.
Winshark is also able to parse tracelogging-based providers.
Capture network traffic
To capture network traffic using Winshark, you can use two simple ways:
pktmon (Packet Monitor)
pktmon is an in-box, cross-component network diagnostics tool for Windows. It can be used for packet capture, packet drop detection, packet filtering and counting (supported from RS5)
Then launch Wireshark with administrator privileges and select Winshark-PacketCapture interface:
That will start the packet capture:
Filtering on process ID
ETW marks each packet with a header that sets some metadata about the sender.
One of these is the Process ID of the emitter. This is a huge improvement from a classic packet capture from an NDIS driver.
Simply fill the filter field of Wireshark with the following expression:
winshark.header.ProcessId == 1234
Capturing NamedPipe
@kobykahane provide a file system filter driver that emit an ETW for every action perform on a NamedPipe.
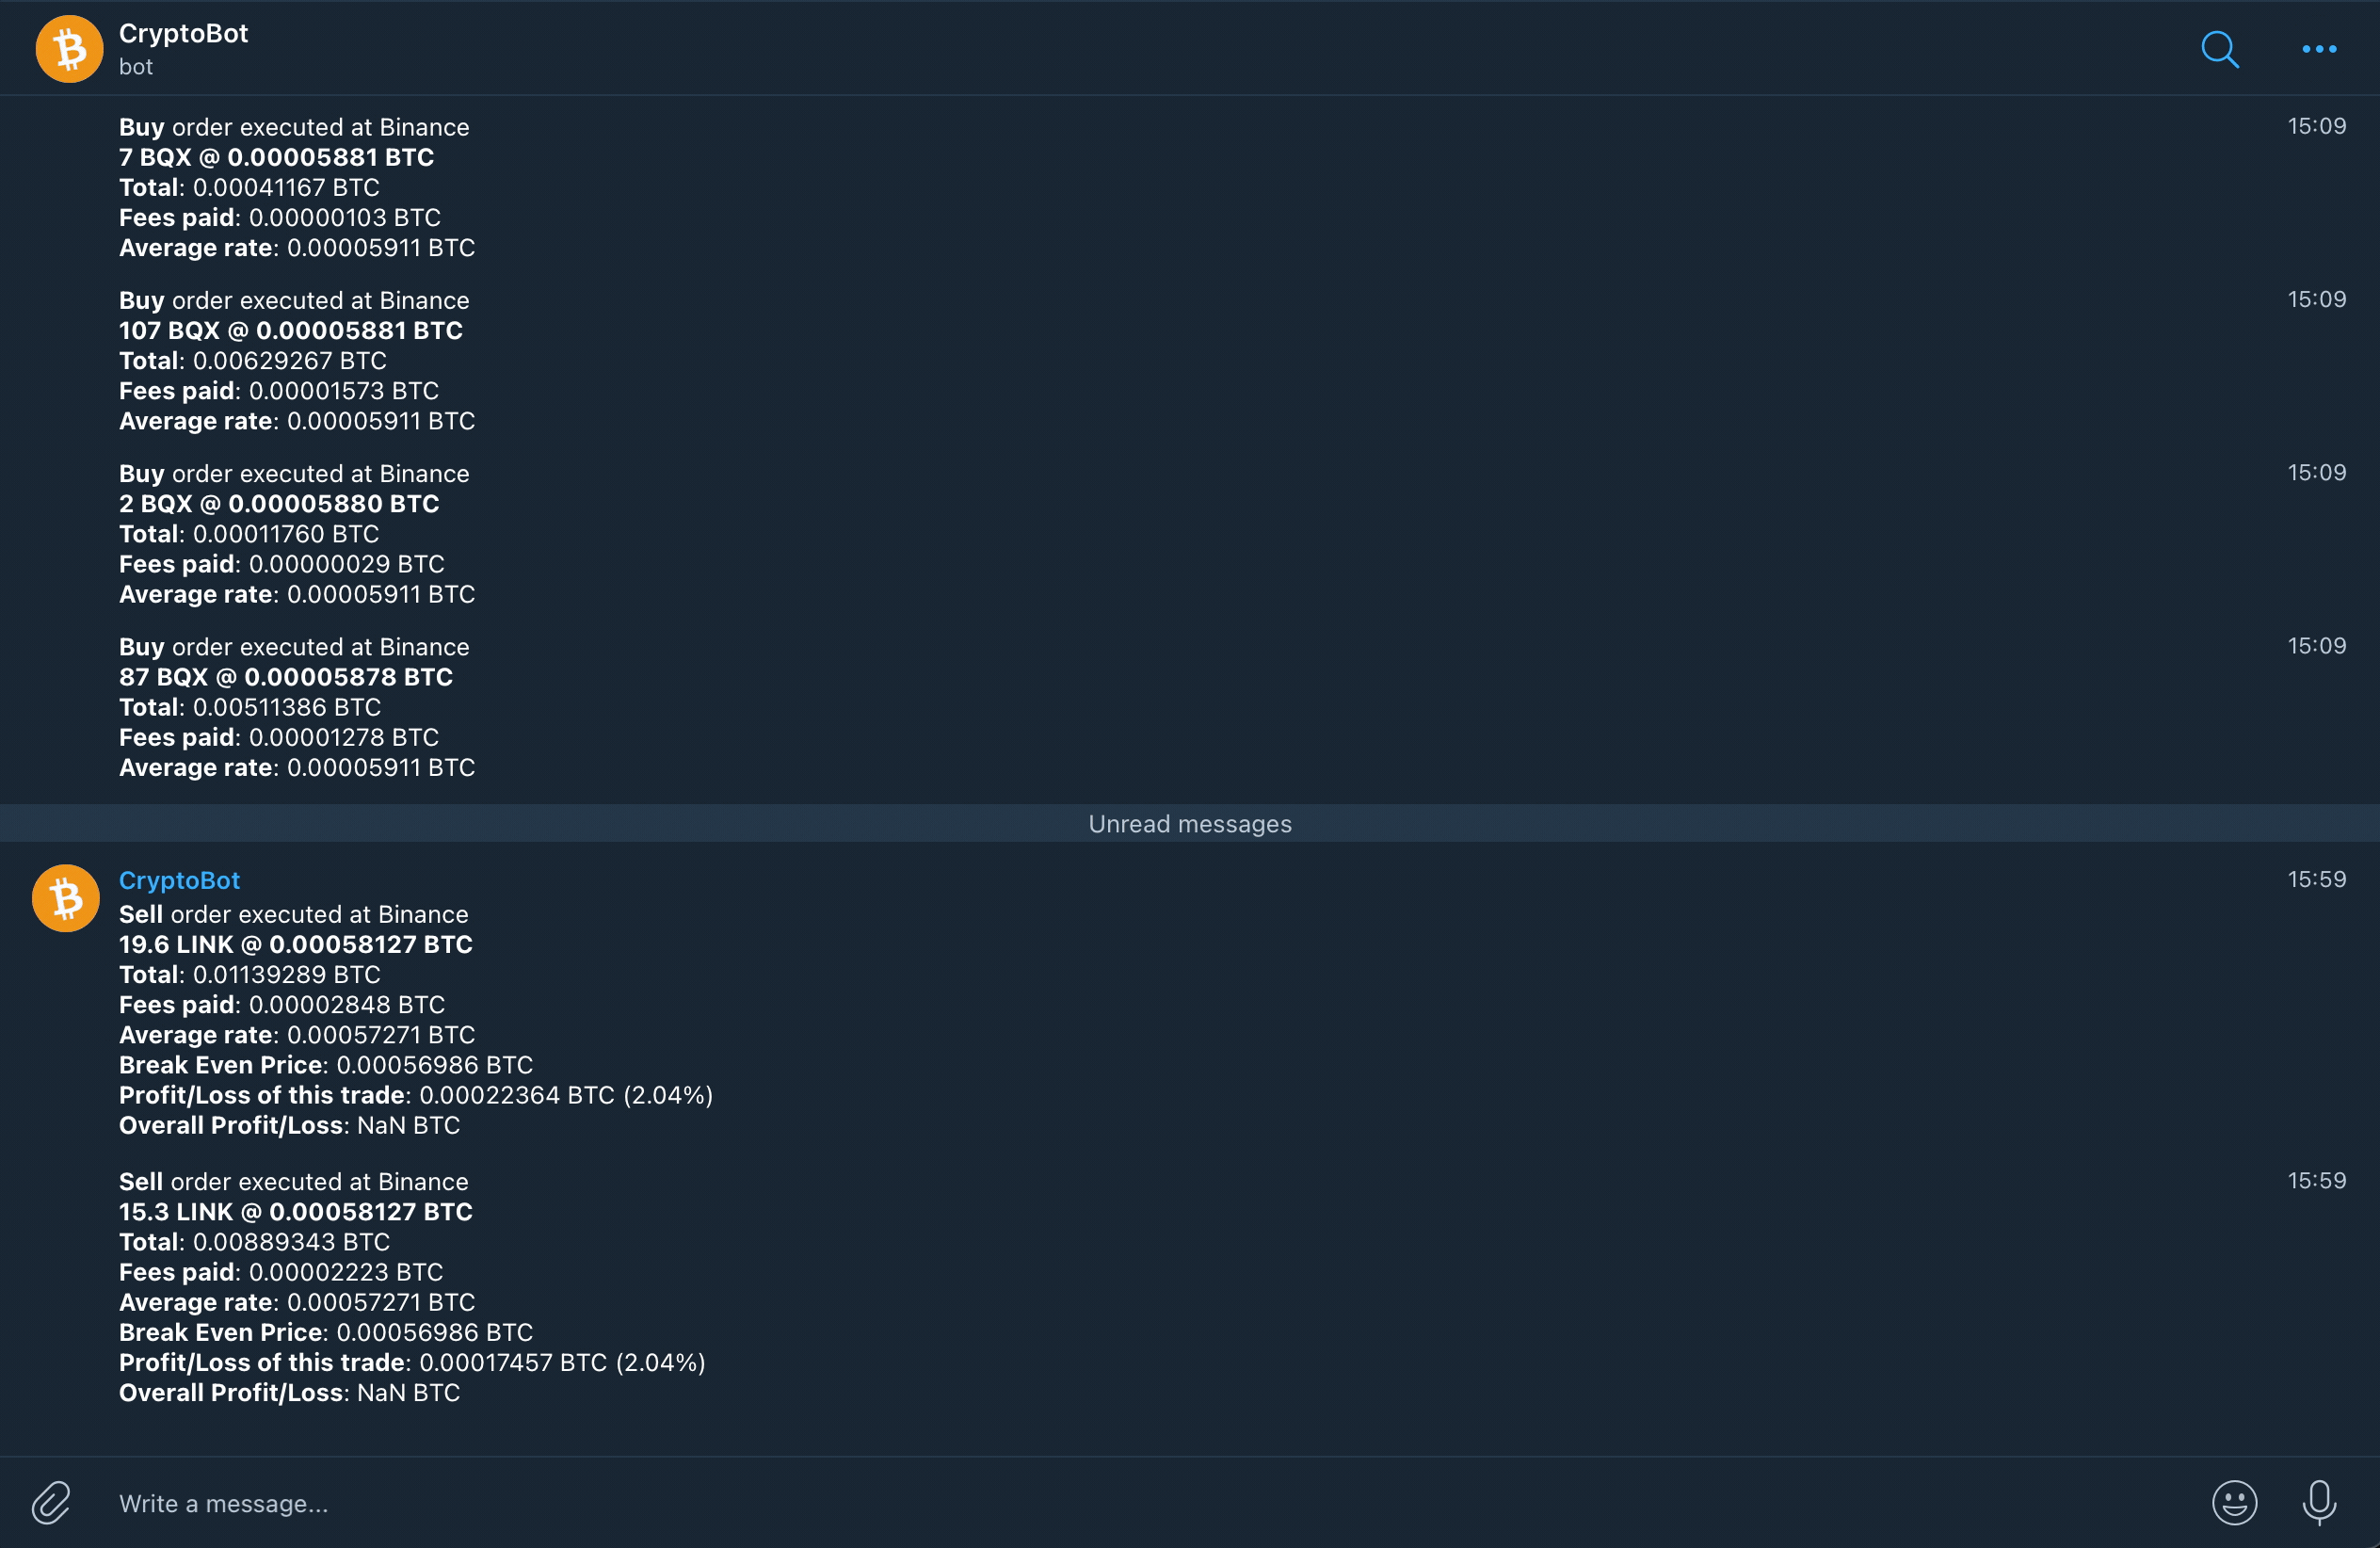
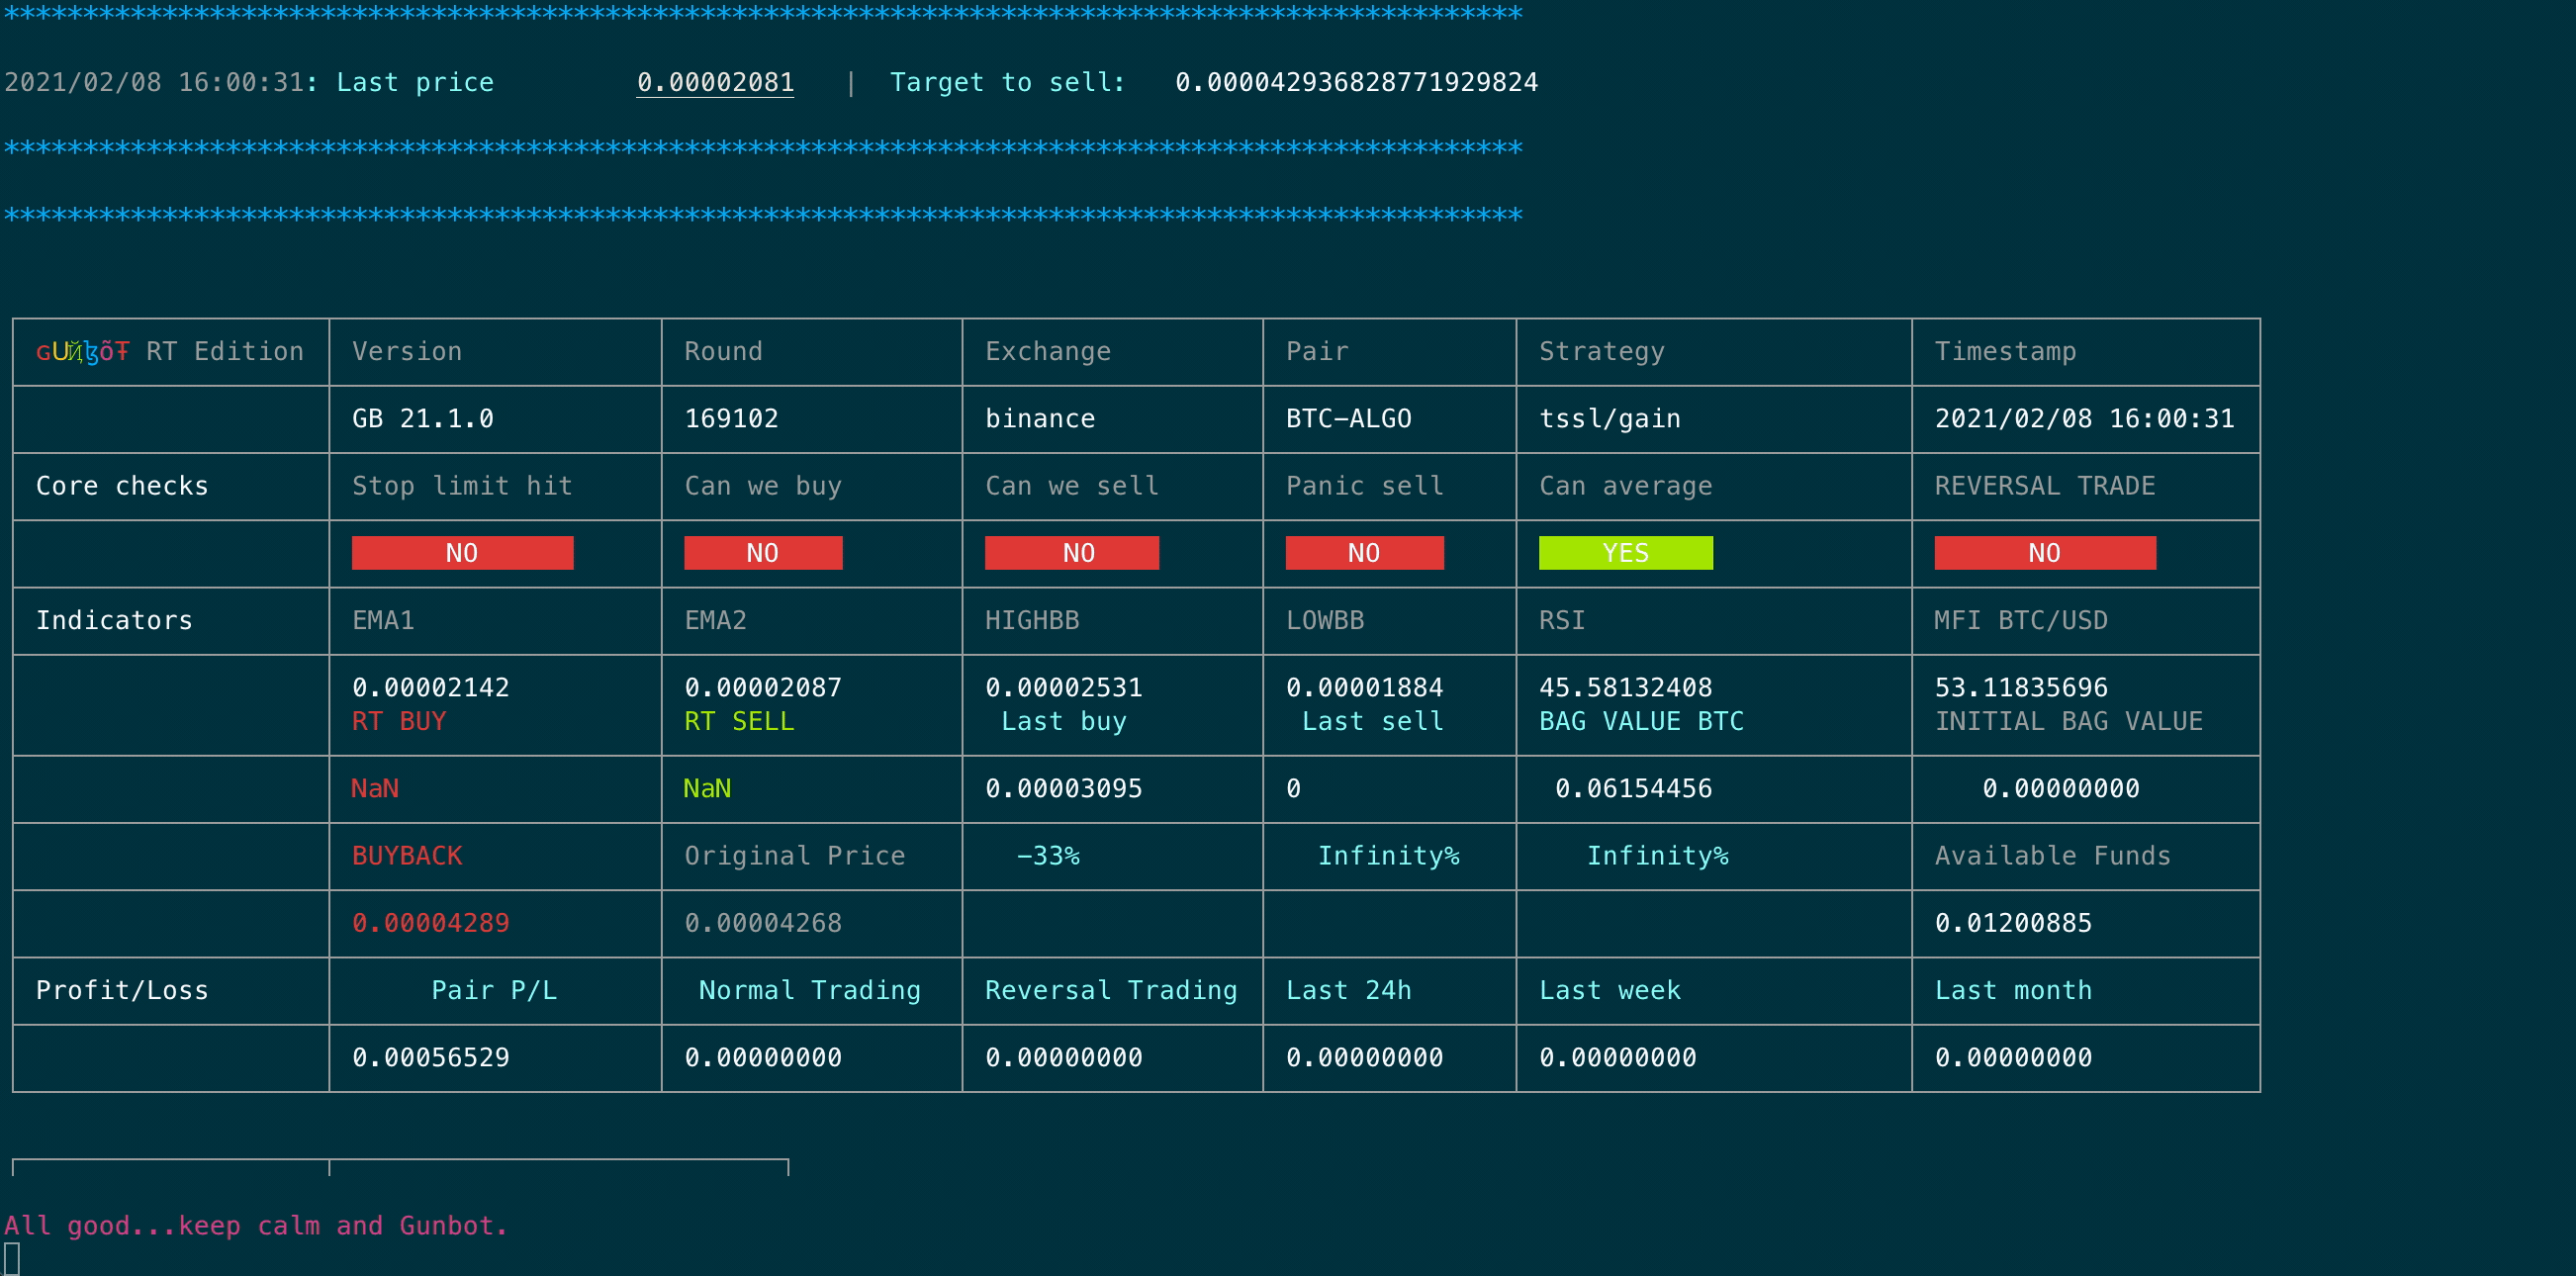
Although this Docker Image has been tested on a Synology NAS, it will work essentially in any Docker-environment with the adjustment of the mount-point needed. I have provided a base-configuration under /config/ which I suggest you read and adjust. If you use the autoconfig (please read the /config/autoconfig-instructions.txt before enabling) provided, and once you have added your Binance credentials, the BOT will start trading.
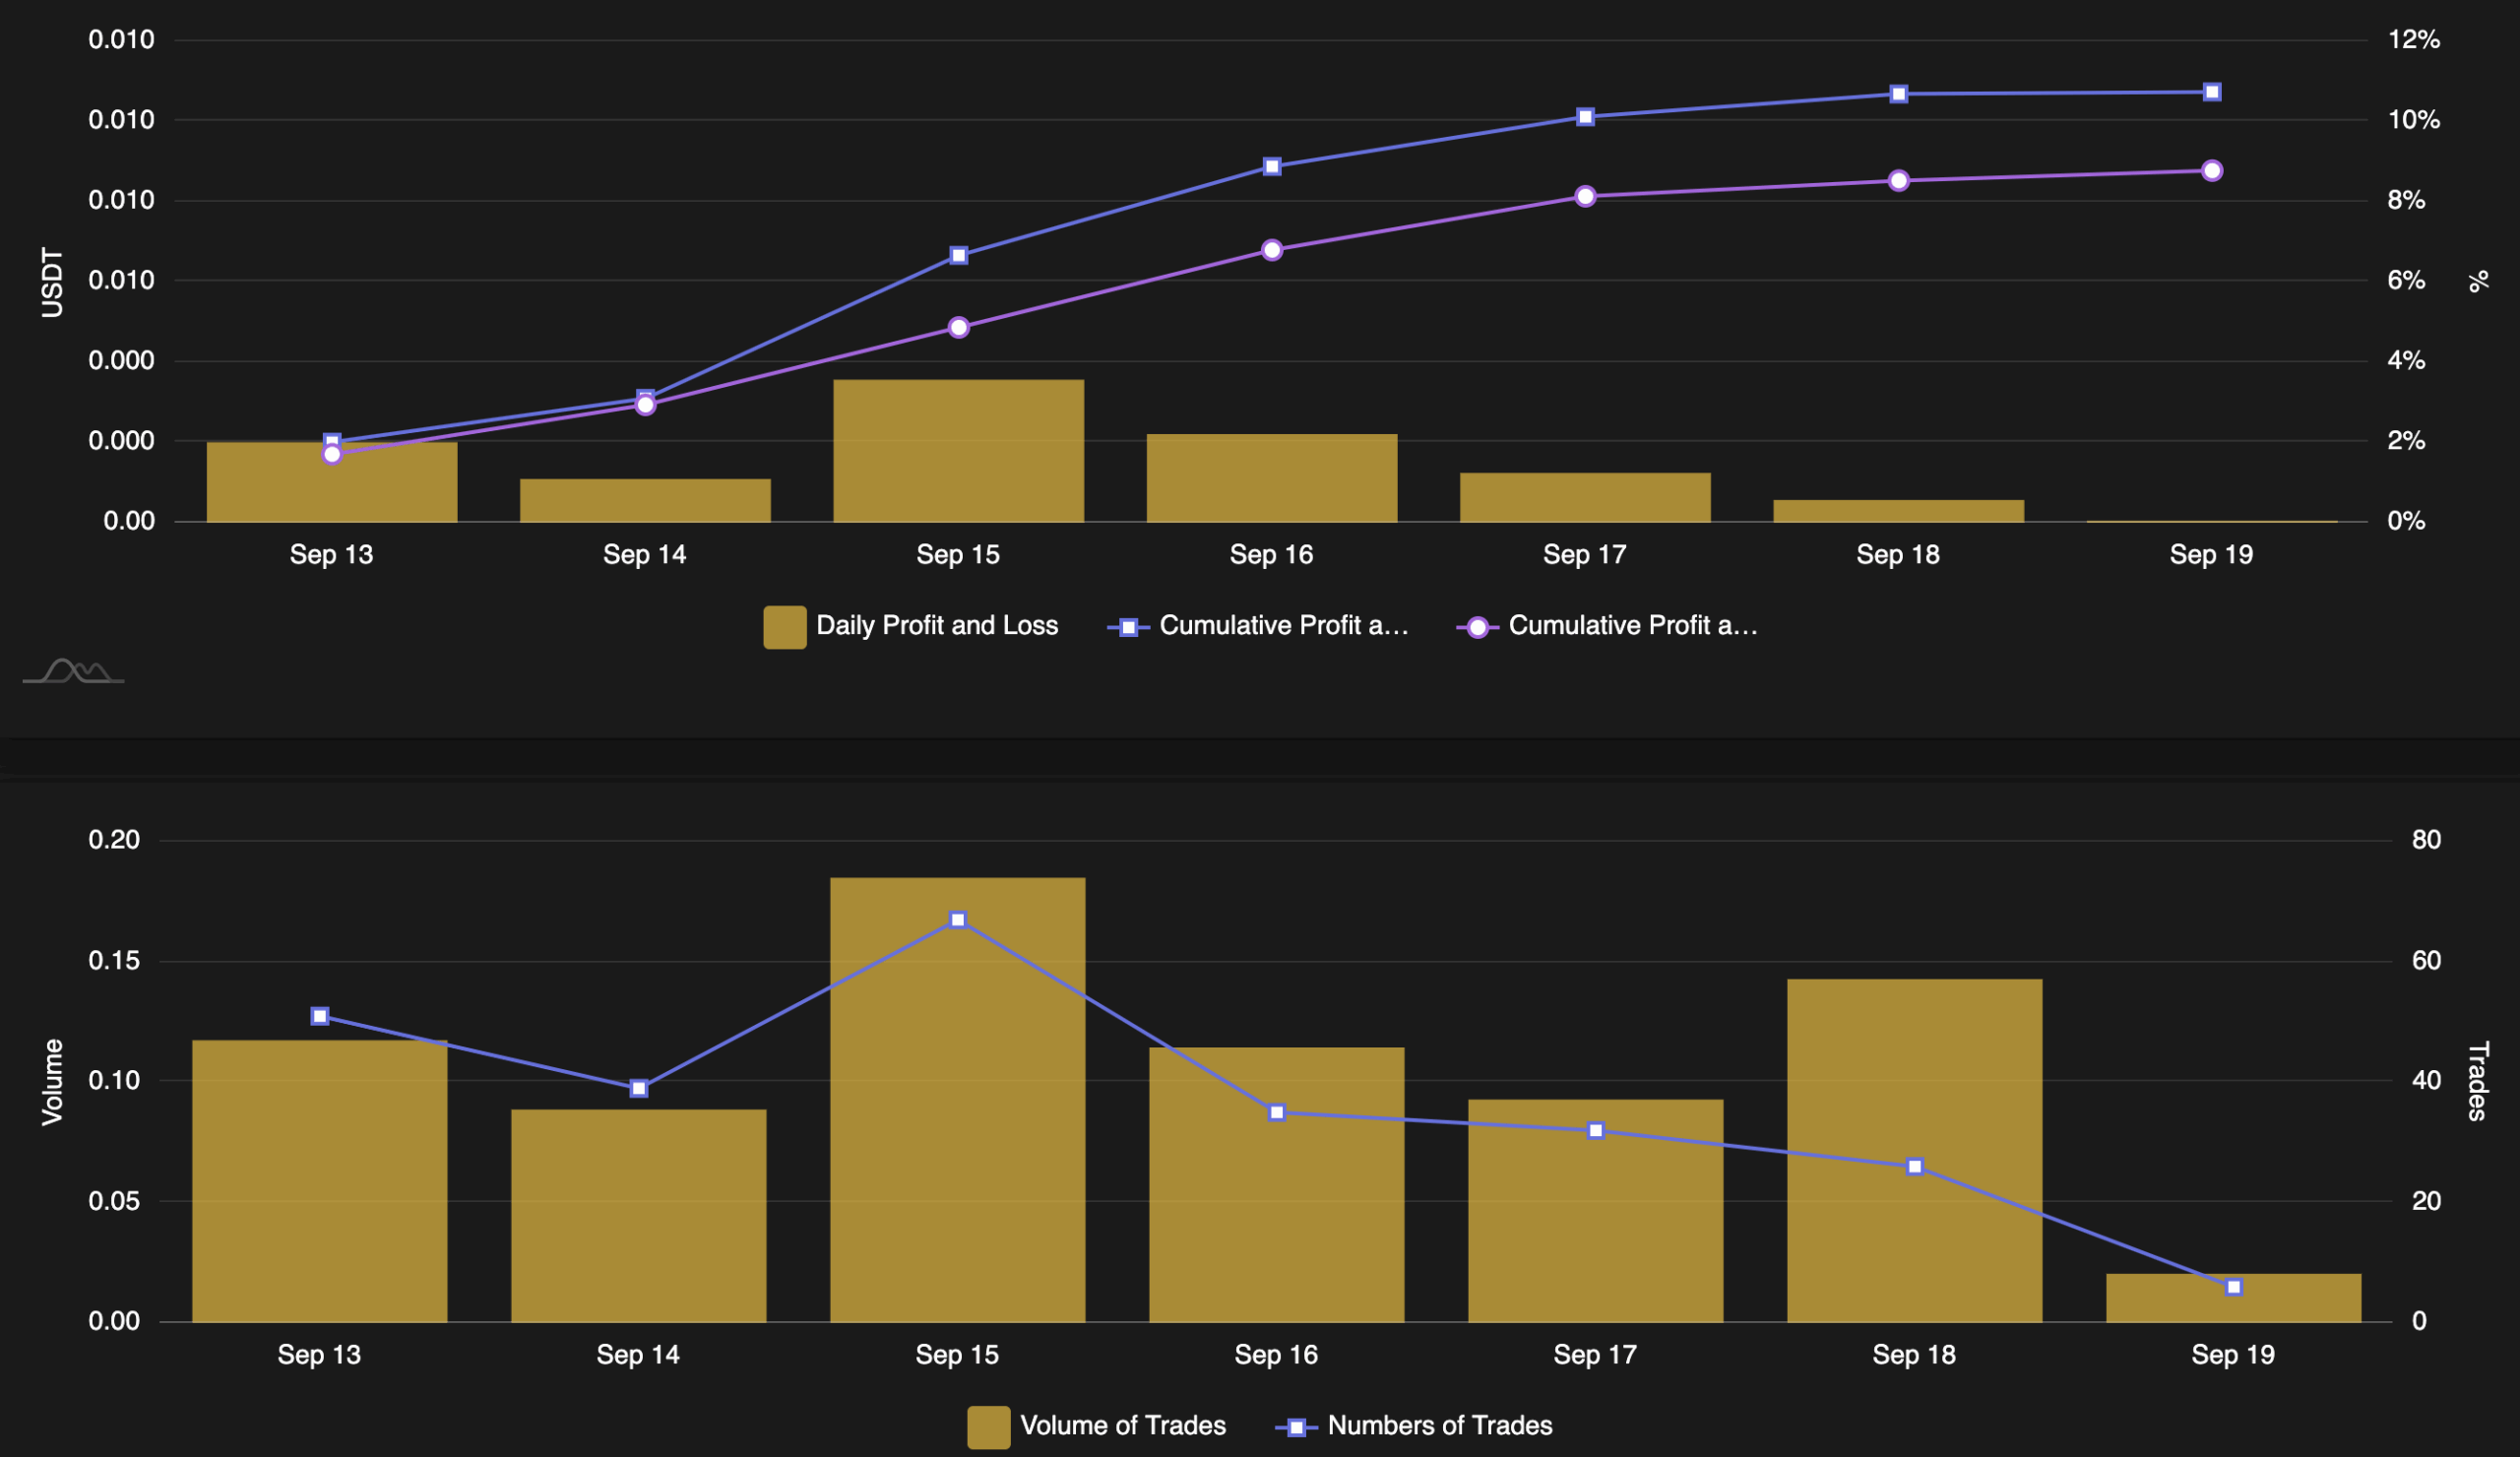
🚸 The provided config contains a Autoconfig using a Stepgrid trading algorithm with the base of BTC, trading 8 pairs. This works at the moment extremely well for at the current market (August 2021) with returns of 1-8% per trade and trading between 20-50 times per day on Binance. Do read the /config/autoconfig-instructions.txt and only change what is allowed. Alternatively, use the standard Gunbot install and use an algorithm you understand / are comfortable with.
😭 Do not come crying to me if you lost your house and your wife left you because you traded away your savings. Be responsible and only trade what you are prepared to lose. I am not a financial advisor, and will not help you with your financial troubles.
🍺 Please support me: Although all my software is free, it is always appreciated if you can support my efforts on Github with a contribution via Paypal – this allows me to write cool projects like this in my personal time and hopefully help you or your business.
I am a Gunbot Reseller and Binance Affiliate
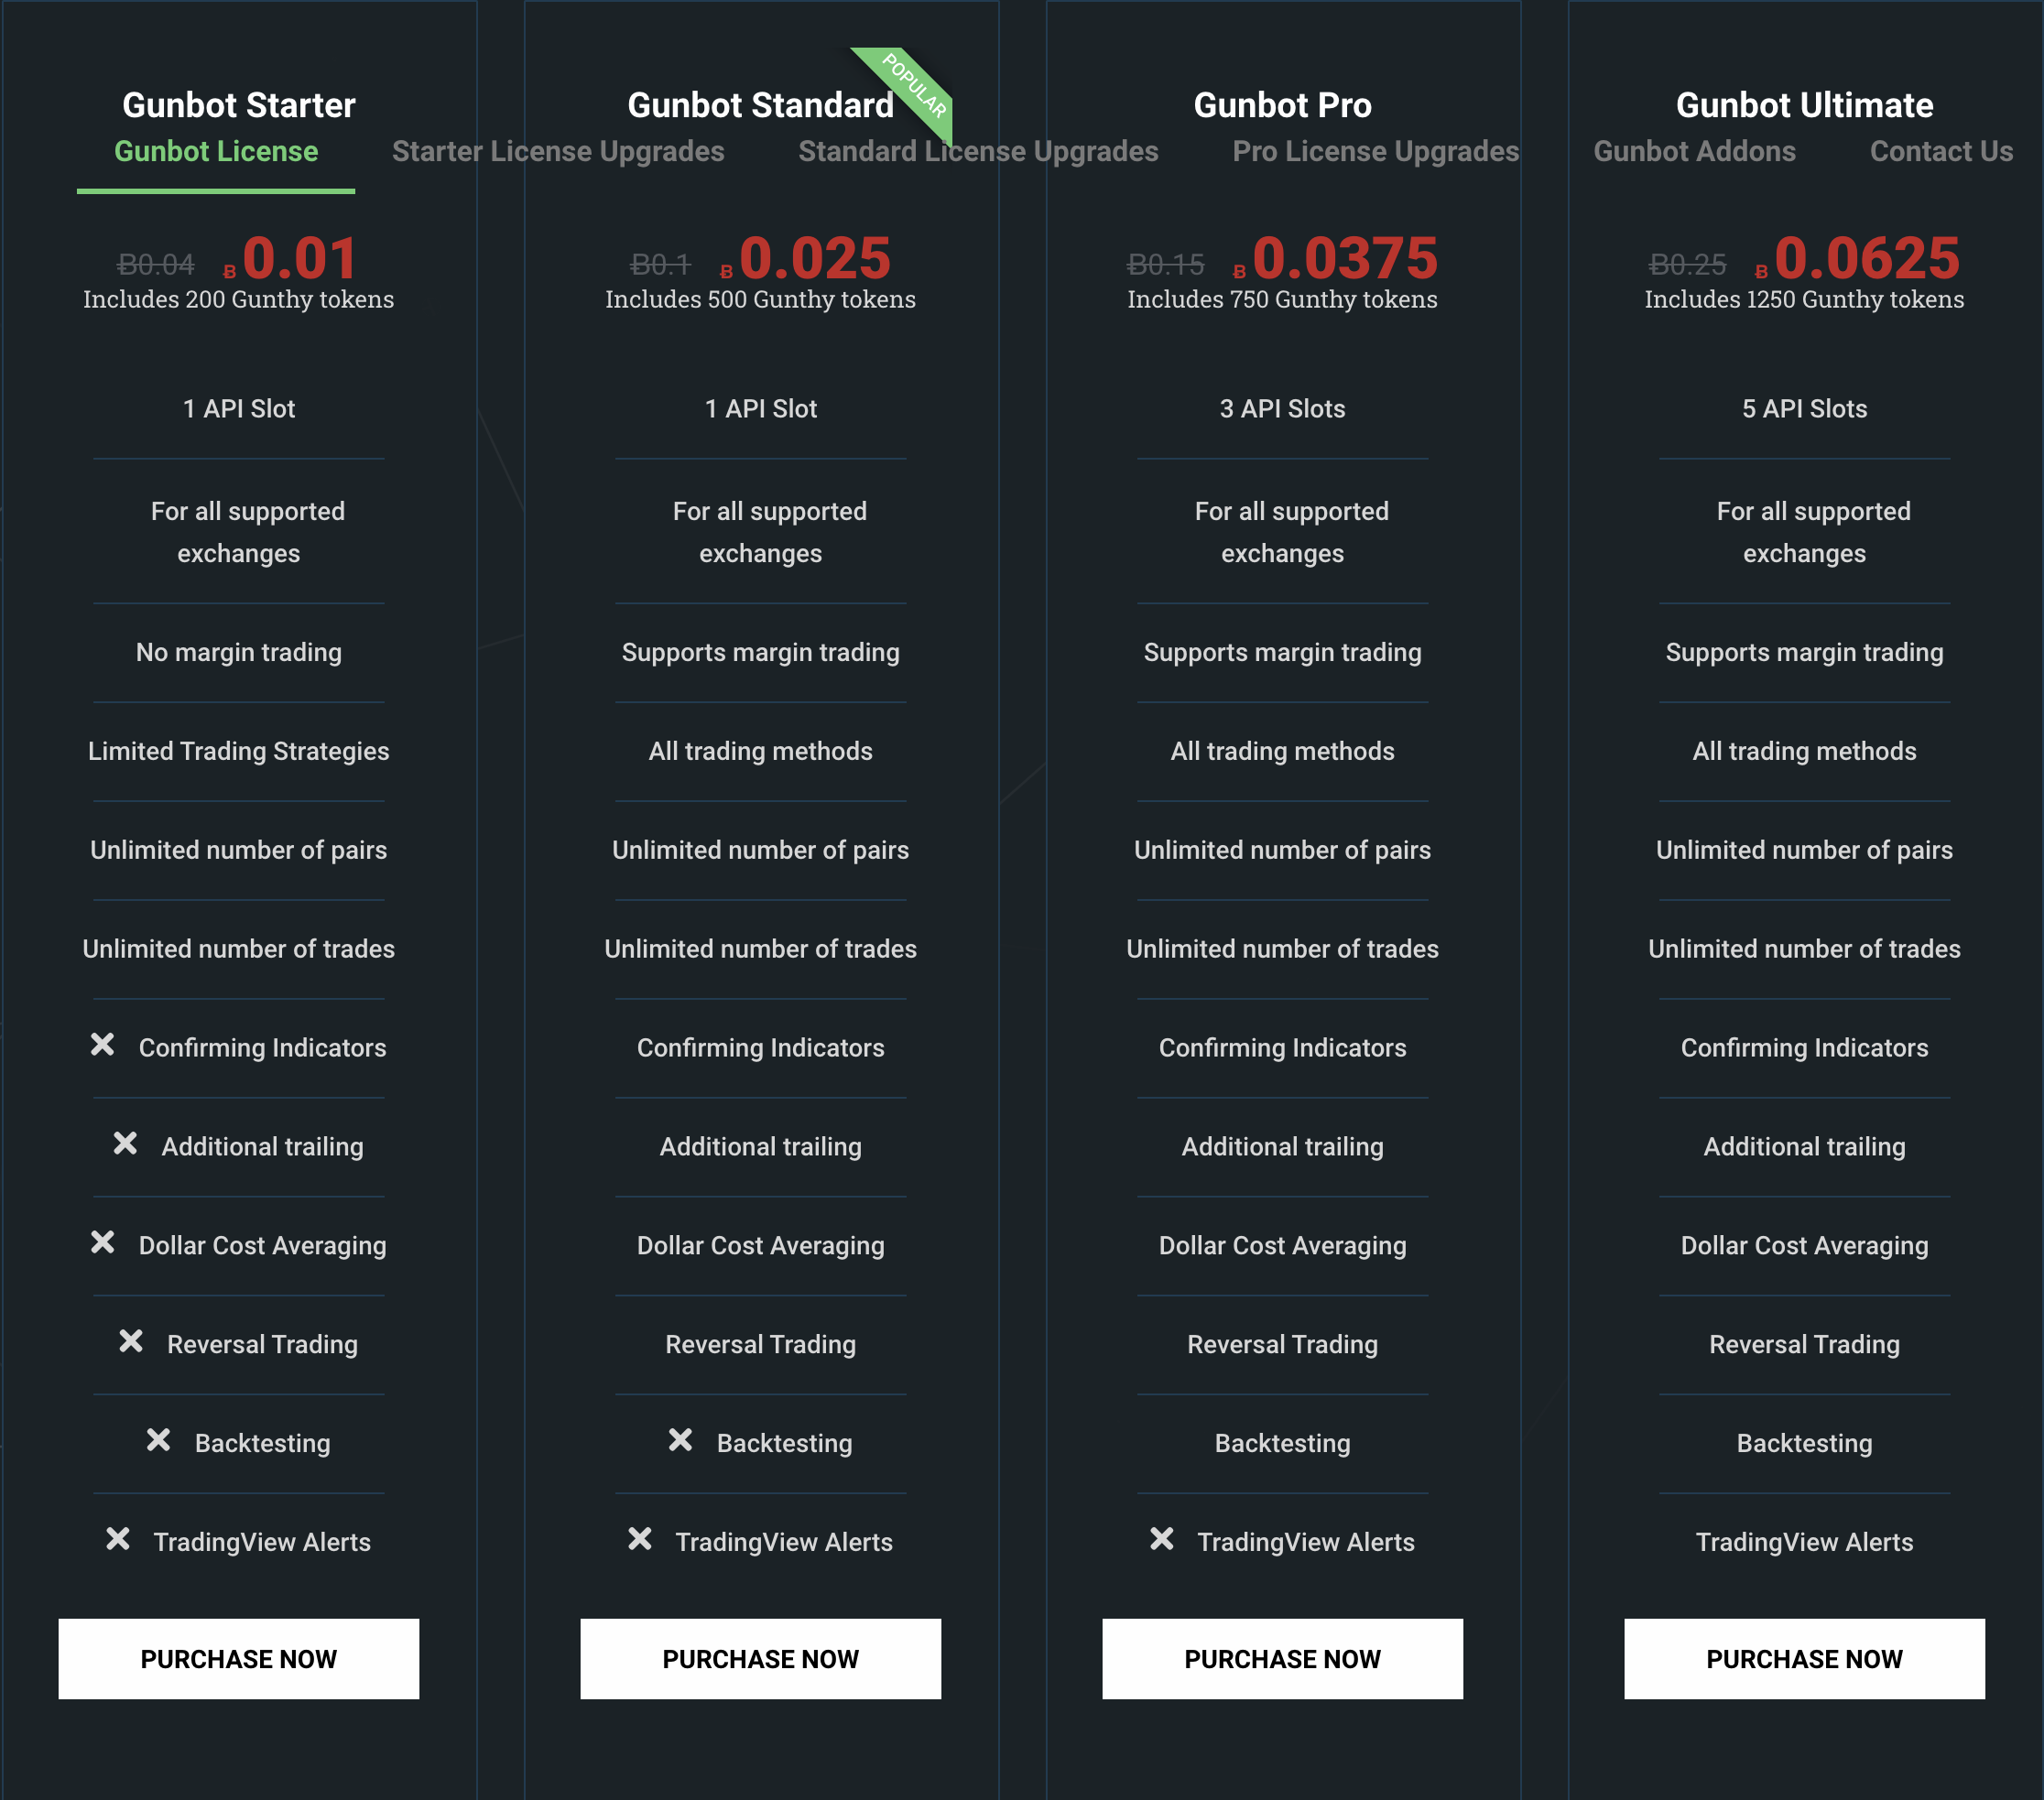
You need at least a “Gunbot Standard” License to trade on Binance and use the provided autoconfig tool which automatically trades BTC-ALT coins for you. I am an offical Gunbot Reseller and you can purchase a license straight from the links below or via gunbot.at:
Docker image with colorised output & Telegram Support
Gunbot Dockerfile with glibc and colorised output
Gunbot Dockerfile with Telegram Notifications
Setup On Synology
ℹ️ I use the container gunbot for Binance and the container gunbot-kucoinfor Kucoin. If you do not need both, delete the one you are using.
ℹ️ The container gunbot-kucoin only trades USDT-CRO as I like Crypto.com – please adjust if you need anything else. The trading limit for USDT-CRO is set to USDT=150 per trade (see "TRADING_LIMIT": "150",in
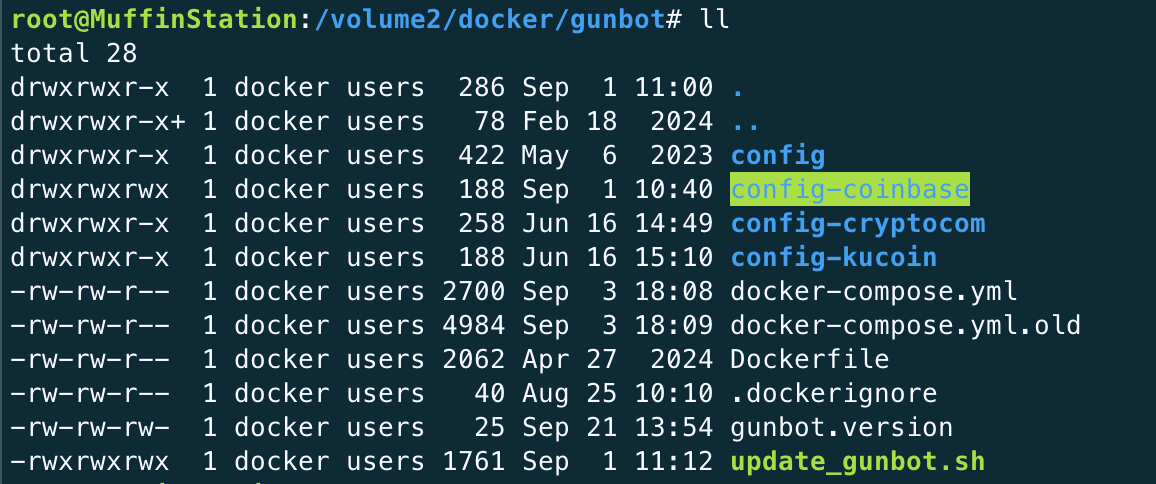
If you have a mount-point /volume1/, create the directory /volume1/docker/gunbot/ and skip to Step 3)
If you do not have /volume1/, adjust the mountpoints of /volume1/docker/gunbot/ in docker-compose.yml
Copy docker-compose.yml, dockerignore and Dockerfile from this repo to your ./gunbot/-folder. If you also want to use beta-releases, use the Dockerfile.slipstream.local instead and rename it to Dockerfile. This requires that you have the beta-release in the same folder as the Dockerfile named as gunthy-linux.zip
3.a.) I created a setup.sh which you can execute in your gunbot-directory which will do the copying of files and adjusting permissions – run this in your gunbot directory:
cd /volume1/docker/gunbot/
docker build -t gunbot .
docker-compose up -d

# Logs for Gunbot-Binance
docker logs -n 100 -f gunbot

# Logs for Gunbot-Kucoin
docker logs -n 100 -f gunbot-kucoin
Updating Gunbot
From time to time I publish updates – mostly to adjust the Linux image or to include the latest Gunbot release. You can manually update by:
Stop and delete the Gunbot-Container in Synology Docker
Repeat Steps 6-7 above
Telegram Configuration
Notifications work by first creating a personal bot on Telegram, Gunbot then connects to this bot to push notifications to you.
This is how to create a bot:
Talk to @botfather. Create a new bot with the command /newbot and choose a name and username for your bot. Save the bot token shown.
Talk to @myidbot to see your Chat ID, save it.
Enable Telegram notifications for Gunbot, and enter the token and ID you’ve just gathered. Use the ID for both the user and admin ID fields, this makes sure that only you can interact with the Telegram bot. Alternatively, you can set a comma separated list for Admin ID, specifying multiple IDs who may interact with the bot.
Start a chat with the username you’ve picked for your bot, and hit the start button. If you don’t see a start button, write “/start” and send it as message.
To enable trade notifications, enable these in the settings menu inside the Telegram bot.
The Telegram bot is fully integrated into Gunbot. All you need to do to start the Telegram bot is enable Telegram notifications in your Gunbot settings.
After setting it up, type /start to your bot to open the menu.
Overview of Gunbot Licenses
Note: You will need to have at lease “Gunbot Standard” to support all strategies, and I strongly recommend it. If you want to trade on multiple exchanges use “Gunbot Pro” (3 API Slots) or “Gunbot Ultimate (5 API Slots)
Gunbot License differences – click to purchase a “Gunbot Standard License” or pick other licenses from above
How does the autoconfig work?
The idea is to have a fully automated setup for BTC-alt trading that trades relatively frequently (in tests, about 20-50 times per day) and only focusses on small trades with around 0.5% to 2% profit per trade. This config bundle offers completely autonomous trading with the stepGrid strategy. You set a few basic settings like how many pairs to trade, the script handles everything else.
The setup consists of a config.js and autoconfig.json file, which do the following (summarized):
🚸 The “autoconfig.json” in the “gunbot” container trades as base both BTC-ALT and BNB-ALT and each base uses 6 pairs – so you will have 6 BTC-trades and 6-BNB-trades. Please adjust this if you do not want to trade in these volumes (you will need 0,3BTC and 2BNB for it to properly work)
Autoconfig.json
🚸 Warnings:
Because of how trading limit compounding is handled, the setup is difficult to combine with other trades on the same acount
Manual trading on the same exchange account and base currency, or manually made config changes can lead to unexpected behavior
Due to the lack of a bid/ask spread filter on Huobi, pair selection is likely more risky there
Since stop losses are sometimes used in this setup, losing sell orders can happen
The stepGrid strategy is great, but beware for very low volume markets as trading behavior might get erratic. In such a case using the enforce step size option in the strategy itself can help.
All pairs for the exchange must be handled by the included AutoConfig jobs
READ THE WHOLE INSTRUCTIONS
Features:
Scans markets for volatile pairs and adds them automatically, trades them with the stepGrid strategy
Evaluates results for active trading pairs, continously replacing the worst performing pair with another
Supports trading multiple base currencies on the same account, overlap between pairs is prevented automatically
Supports the following base currencies: BTC
Compounding trading limit, with an option to keep reserves
Occasionally uses a higher trading limit when the market seems favorable, including a stop loss mechanism
Frees up funds in case the account runs out of money for further buy orders
Protection against possible losing trades after a very large price difference between buy orders
Notes:
Don’t use all your funds for this. Keeping reserves is always a good idea, you never know what the market will bring in the future
Try to keep relatively low numbers of pairs, to ensure frequent processing per pair
You’ll see more pairs being added than it may trade, this is fine because it won’t actually trade every single added pair
Upgrades are as simple as overwriting the autoconfig.json file, unless specified differently in the release notes
Troubleshooting
If you do not manage to resolve your problems with basic troubleshooting, log a Issue in this project. For basic problems:
Check that your permissions of folders are correct:
Check the log output when starting the container
docker logs -n 100 -f gunbot
Check for any Gunbot errors – most of the time the JSON is invalid (missing brackets, commas, quotes)
If you log an issue, ensure that you include your logs, but make sure to remove any reference to your API keys or Gunbot masterkeys/passwords.
Donations are always welcome
🍻 Support my work
All my software is free and built in my personal time. If it helps you or your business, please consider a small donation via PayPal — it keeps the coffee ☕ and ideas flowing!
💸 Crypto Donations
You can also send crypto to one of the addresses below:


 https://github.com/flavioccf/nlw2-web