Frontend Mentor – Huddle landing page with single introductory section
Welcome! 👋
Thanks for checking out this front-end coding challenge.
Frontend Mentor challenges allow you to improve your skills in a real-life workflow.
To do this challenge, you need a basic understanding of HTML and CSS.
Where to find everything
Your task is to build out the project to the designs inside the /design folder. You will find both a mobile and a desktop version of the design to work to.
The designs are in JPG static format. This will mean that you’ll need to use your best judgment for styles such as font-size, padding and margin. This should help train your eye to perceive differences in spacings and sizes.
If you would like the Sketch file in order to see sizes etc, it is available to download from the challenge page.
You will find all the required assets in the /images folder. The assets are already optimized.
There is also a style-guide.md file, which contains the information you’ll need, such as color palette and fonts.
Building your project
Feel free to use any workflow that you feel comfortable with. Below is a suggested process, but do not feel like you need to follow these steps:
Initialize your project as a public repository on GitHub. This will make it easier to share your code with the community if you need some help. If you’re not sure how to do this, have a read through of this Try Git resource.
Configure your repository to publish your code to a URL. This will also be useful if you need some help during a challenge as you can share the URL for your project with your repo URL. There are a number of ways to do this, but we recommend using Vercel. We’ve got more information about deploying your project with Vercel below.
Look through the designs to start planning out how you’ll tackle the project. This step is crucial to help you think ahead for CSS classes that you could create to make reusable styles.
Before adding any styles, structure your content with HTML. Writing your HTML first can help focus your attention on creating well-structured content.
Write out the base styles for your project, including general content styles, such as font-family and font-size.
Start adding styles to the top of the page and work down. Only move on to the next section once you’re happy you’ve completed the area you’re working on.
If you’d like to try making your project fully responsive, we’d recommend checking out Sizzy. It’s a great browser that makes it easy to view your site across multiple devices.
Deploying your project
As mentioned above, there are a number of ways to host your project for free. We recommend using Vercel as it’s an amazing service and extremely simple to get set up with. If you’d like to use Vercel, here are some steps to follow to get started:
Sign up to Vercel and go through the onboarding flow, ensuring your GitHub account is connected by using their Vercel for GitHub integration.
Connect your project to Vercel from the “Import project” page, using the “From Git Repository” button and selecting the project you want to deploy.
Once connected, every time you git push, Vercel will create a new deployment and the deployment URL will be shown on your Dashboard. You will also receive an email for each deployment with the URL.
Sharing your solution
There are multiple places you can share your solution:
Share your solution page in the #finished-projects channel of the Slack community.
Tweet @frontendmentor and mention @frontendmentor including the repo and live URLs in the tweet. We’d love to take a look at what you’ve built and help share it around.
Giving feedback
Feedback is always welcome, so if you have any to give on this challenge please email hi[at]frontendmentor[dot]io.
This challenge is completely free. Please share it with anyone who will find it useful for practice.
Have fun building! 🚀
Community Sponsors
A massive thank you to our community sponsors!
Vercel offers an amazing website hosting service, which is super simple to set up. Just connect your GitHub account, point to a repo and your site will be deployed. Perfect for your website and frontend hosting needs - especially since it’s free to get started!
Sizzy is an extremely useful browser designed specifically to improve a developer’s workflow when building websites. You can fire up multiple device emulators and run them all in sync while building out your web pages. Perfect for helping build fully responsive websites!
Qualified helps companies assess engineers with realistic code tests and pair-programming interviews. Their assessments test on-the-job skills as opposed to algorithmic puzzles which leads to a much better recruitment process for everyone involved.
Featurify is just yet another implementation of feature flags thats super easy to setup and use. It intends to solve one and only one issue where feature flags are user specific.
Background
Featurify is designed to be really light weight and easily integrate with .net core 2.0+ web applications. This is intended to be
one part of a two piece puzzle. If you are interested in simple application settings based feature flags, this library is not for
you! There are a number of other options for that purpose (refer to various sections at the end of this file).
First part of this puzzle is elaborated in the usage section. Second part of the puzzle is to design a user interface that would
help administrators identify the features, and also tie them to users (step 2 in usage deals with the integration to this part of the puzzle).
The need for this came up for my project because I found out LaunchDarkly that provides feature flags as a service, but its not
free! The not free part let to this package and this would require minimal effort to achieve the same.
Usage
Add the Featurify nuget package using the nuget package manager. The Featurify.Contract nuget package is also added automatically. If you want to have a seperate project to define IUserInfoStrategy, IToggleMetadataFinder and other associated classes, you can just add the Featurify.Contracts nuget package to that.
Create a class (implementing IUserInfoStrategy) that would provide the user information for the current user.
publicclassDemoAppUserFinderStrategy:IUserInfoStrategy{privatereadonlyIHttpContextAccessoraccessor;publicDemoAppUserFinderStrategy(IHttpContextAccessoraccessor){this.accessor=accessor;}publicasyncTask<string>GetCurrentUserId(){// This is just an illustration. In real life you would ideally use the instance of IHttpContextAccessor// to get the logged in user's user id or email addressawaitTask.CompletedTask;return"b0486d0f-9114-41a7-a095-e4e92201a41e";}}
(Optional) Create a class that (implementing IFeatureNameTransformer) will dictate the format of feature names. Default is Featurify.{featureName}
Create a class (implementing IToggleMetadataFinder) that would provide the metadata for the feature for a/all specific user(s)
publicclassDemoAppFeatureMetadataFinder:IToggleMetadataFinder{privatereadonlyIAppDbContextdbContext;publicDemoAppFeatureMetadataFinder(IAppDbContextdbContext){this.dbContext=dbContext;}publicasyncTask<IToggleMetadata>FindToggleStatus(stringfeatureName,stringuserId){// This is just an illustration. In real life you would use a data context to identify the feature toggle// status for the user// featureName => the transformed feature name based on your initial setup// default is "Featurify.{featureName}"// userId => this will be logged in user's id identified by your IUserInfoStrategy instanceawaitTask.CompletedTask;varmetadata=newToggle{Name=featureName,Value=featureName.Contains("ImportFeature")?true:false,UserId="?"// Indicates any user, see step 5 for more details};returnmetadata;}}publicclassToggle:IToggleMetadata{publicstringName{get;set;}publicboolValue{get;set;}publicstringUserId{get;set;}}
Add the featurify service in Startup.cs
publicvoidConfigureServices(IServiceCollectionservices){services.AddMvc();services.AddFeaturify<DemoAppFeatureMetadataFinder,DemoAppUserFinderStrategy>(options =>{// Identifier if a feature is common for all usersoptions.AnyUserVerifier="?";// If this is set to true, and a match is not found through IToggleMetadataFinder.FindToggleStatus, an exception will be thrownoptions.UseStrict=false;});}
You can now use the package as shown below:
Use it in the controller
// Create a class to represent your featurepublicclassImportFeature:IFeatureToggle{}publicclassHomeController:Controller{privatereadonlyIFeaturifyServerserver;publicHomeController(IFeaturifyServerserver){this.server=server;}publicasyncTask<IActionResult>Contact(){ViewData["Message"]="Your contact page.";varmodel=newContactViewModel{CanImport=awaitserver.Is<ImportFeature>().Enabled()// Verify if the feature is enabled};returnView(model);}}
(or)
Use it in the views
// Create a class to represent your featurepublicclassExportFeature:IFeatureToggle{}
Use it in a view by injecting an instance of IFeaturifyServer
In both the cases listed above the FeaturifyServer first uses the user strategy to get the unique identifier for the logged in user.
If a custom feature name transformer is defined, that is used to transform the feature name. Then, the metadata finder assigned is
used to find the metadata by passing in the feature name and the user id. In this case, for demo purposes, import feature is turned on
and the export feature is turned off.
Note
There is also a syntactic sugar that you can use when verifying if a feature is enabled for the logged in user. Here is an example:
There are a few more samples in this repository. Check out the sample within identity-framework for an implementation in a project that uses the identity framework. The toggle metadata is out of a static list though in this case.
Simple Feature Toggles Based on Application Settings
If you are looking for an implementation of feature flags in .net which can be used out of the box with the help of the application settings file,
check out http://enterprisedevops.org/feature-toggle-frameworks-list, where feature toggles for various languages are listed.
BlueScript is a Non Profit Organization creating open source software to aid people who suffer dylexia.
Contributing
Check out our contributing guide to get started with contributing to this project.
Getting Started
If you want to contribute to this project, you can clone this repository and start working on it. After cloning the repository, you run the following commands to start the project:
npm install
npm run dev
This project uses Nuxt UI pro and license is needed to build the project. You can get a license from Nuxt UI Pro. (Backend code can be found at Backend repository.)
Features
Below are training modules that are available in the BlueScript webapp:
Quick Visual Perception module.
Training to identify and type characters that appear on the screen in 250ms or less.
It improves perceptual speed, visual memory, visualization, and temporal visual processing.
Warning! Almost nothing is complete yet. Everything here is experimental AND
in VERY ACTIVE development. Proceed with caution.
Motivation
Computers are weird. Weird in the sense that they feel magical if you don’t
know how they work. If, and when, you start learning how it works, that magical
feeling fades away. You will either end up with “Wow! This is brillaint” or
“Wow… this is shit.”
So, you have basically two options:
Take the blue pill: Continue using the computer like normal. Magical feeling!
Take the red pill: Go on a learning frenzy. Risk of ending up as mad men +45%
In case it wasn’t obvious yet, I took the latter.
Basically, I wanted to learn more about “computers”. Working on the relatively
high-level software is pretty fun, but I have a bad habit of ending up looking
at low-level internels and workings of stuff.
“Oh, so my calls to malloc() and new ends up calling the syscall mmap()?
Let’s check it’s implementation.. Oh, what’s VMA? What’s a MMU? What’s a
TLB?? What’s the TCR and the MAIR??? How did I get here? Why am I here..
Just to suffer..? :(“
There was these layers of abstraction that I had no idea of! I should’ve
stopped there, but no. Instead, I said: “Okay. I really like the call-of-the-void
feeling of low-level stuff. Let’s go wild and try to learn all the abstractions
by writing a ‘simple’ operating system. What could go wrong?” And now, here I am.
WesterOS
Work-in-progress hobbyist operating system /w “hand-made” microkernel.
The name is from the most political & messed-up continent in the world
of Game of Thrones.[^2] I really like GoT (yeah, judge me all you want) and the
political messiness of it felt similar to my own goals with this project.
Everything is all over the place and nothing makes sense.
This project exists only to help me learn about operating systems and to have
some fun along the way. I don’t claim to know much about OS development. So,
the practices, design chocies and some implementations you see here WILL scare
you.
I suggest to kepp your expectations LOW >.<
Important Note: WesterOS is in very early development. Stuff WILL change,
brake or straight-up be stupid. I am still yet to define an end goal. Until
then expect Everything, Everywhere, All at Once.
Virtual File Systemlike /dev and /proc (idk if this is possible?)
Virtual Memory Management/w 4K page sizes(wow. what a feature, eh?!)
CLI based interface/w basic shell commands like mkdir, touch & cat
Simple userland apps(Hmm.. What kind of games should I “make”?)
Overview
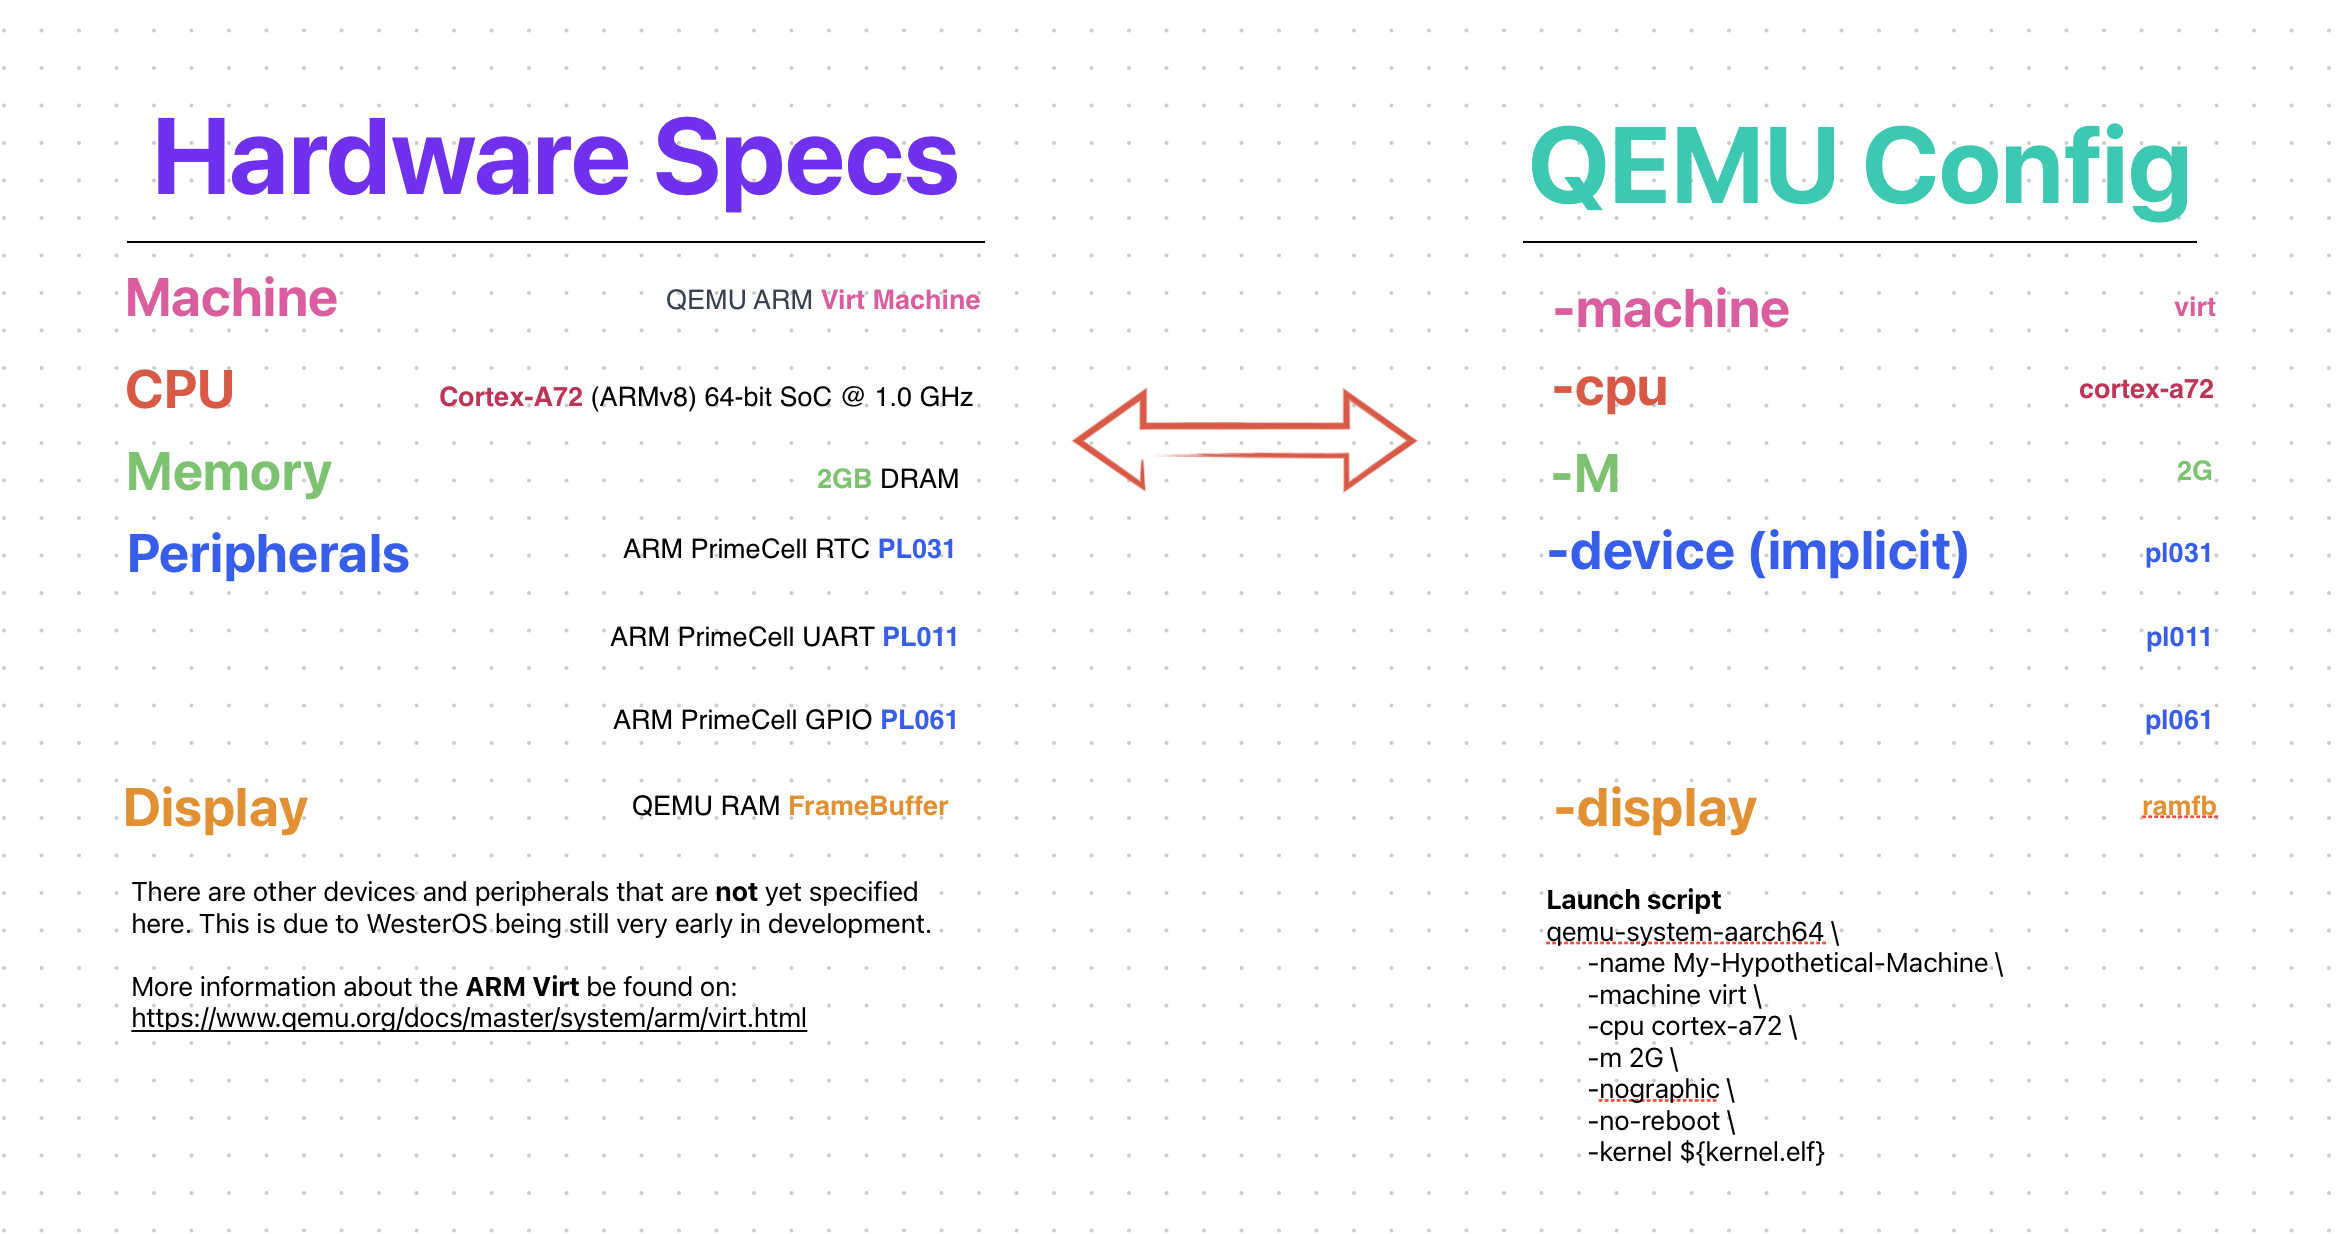
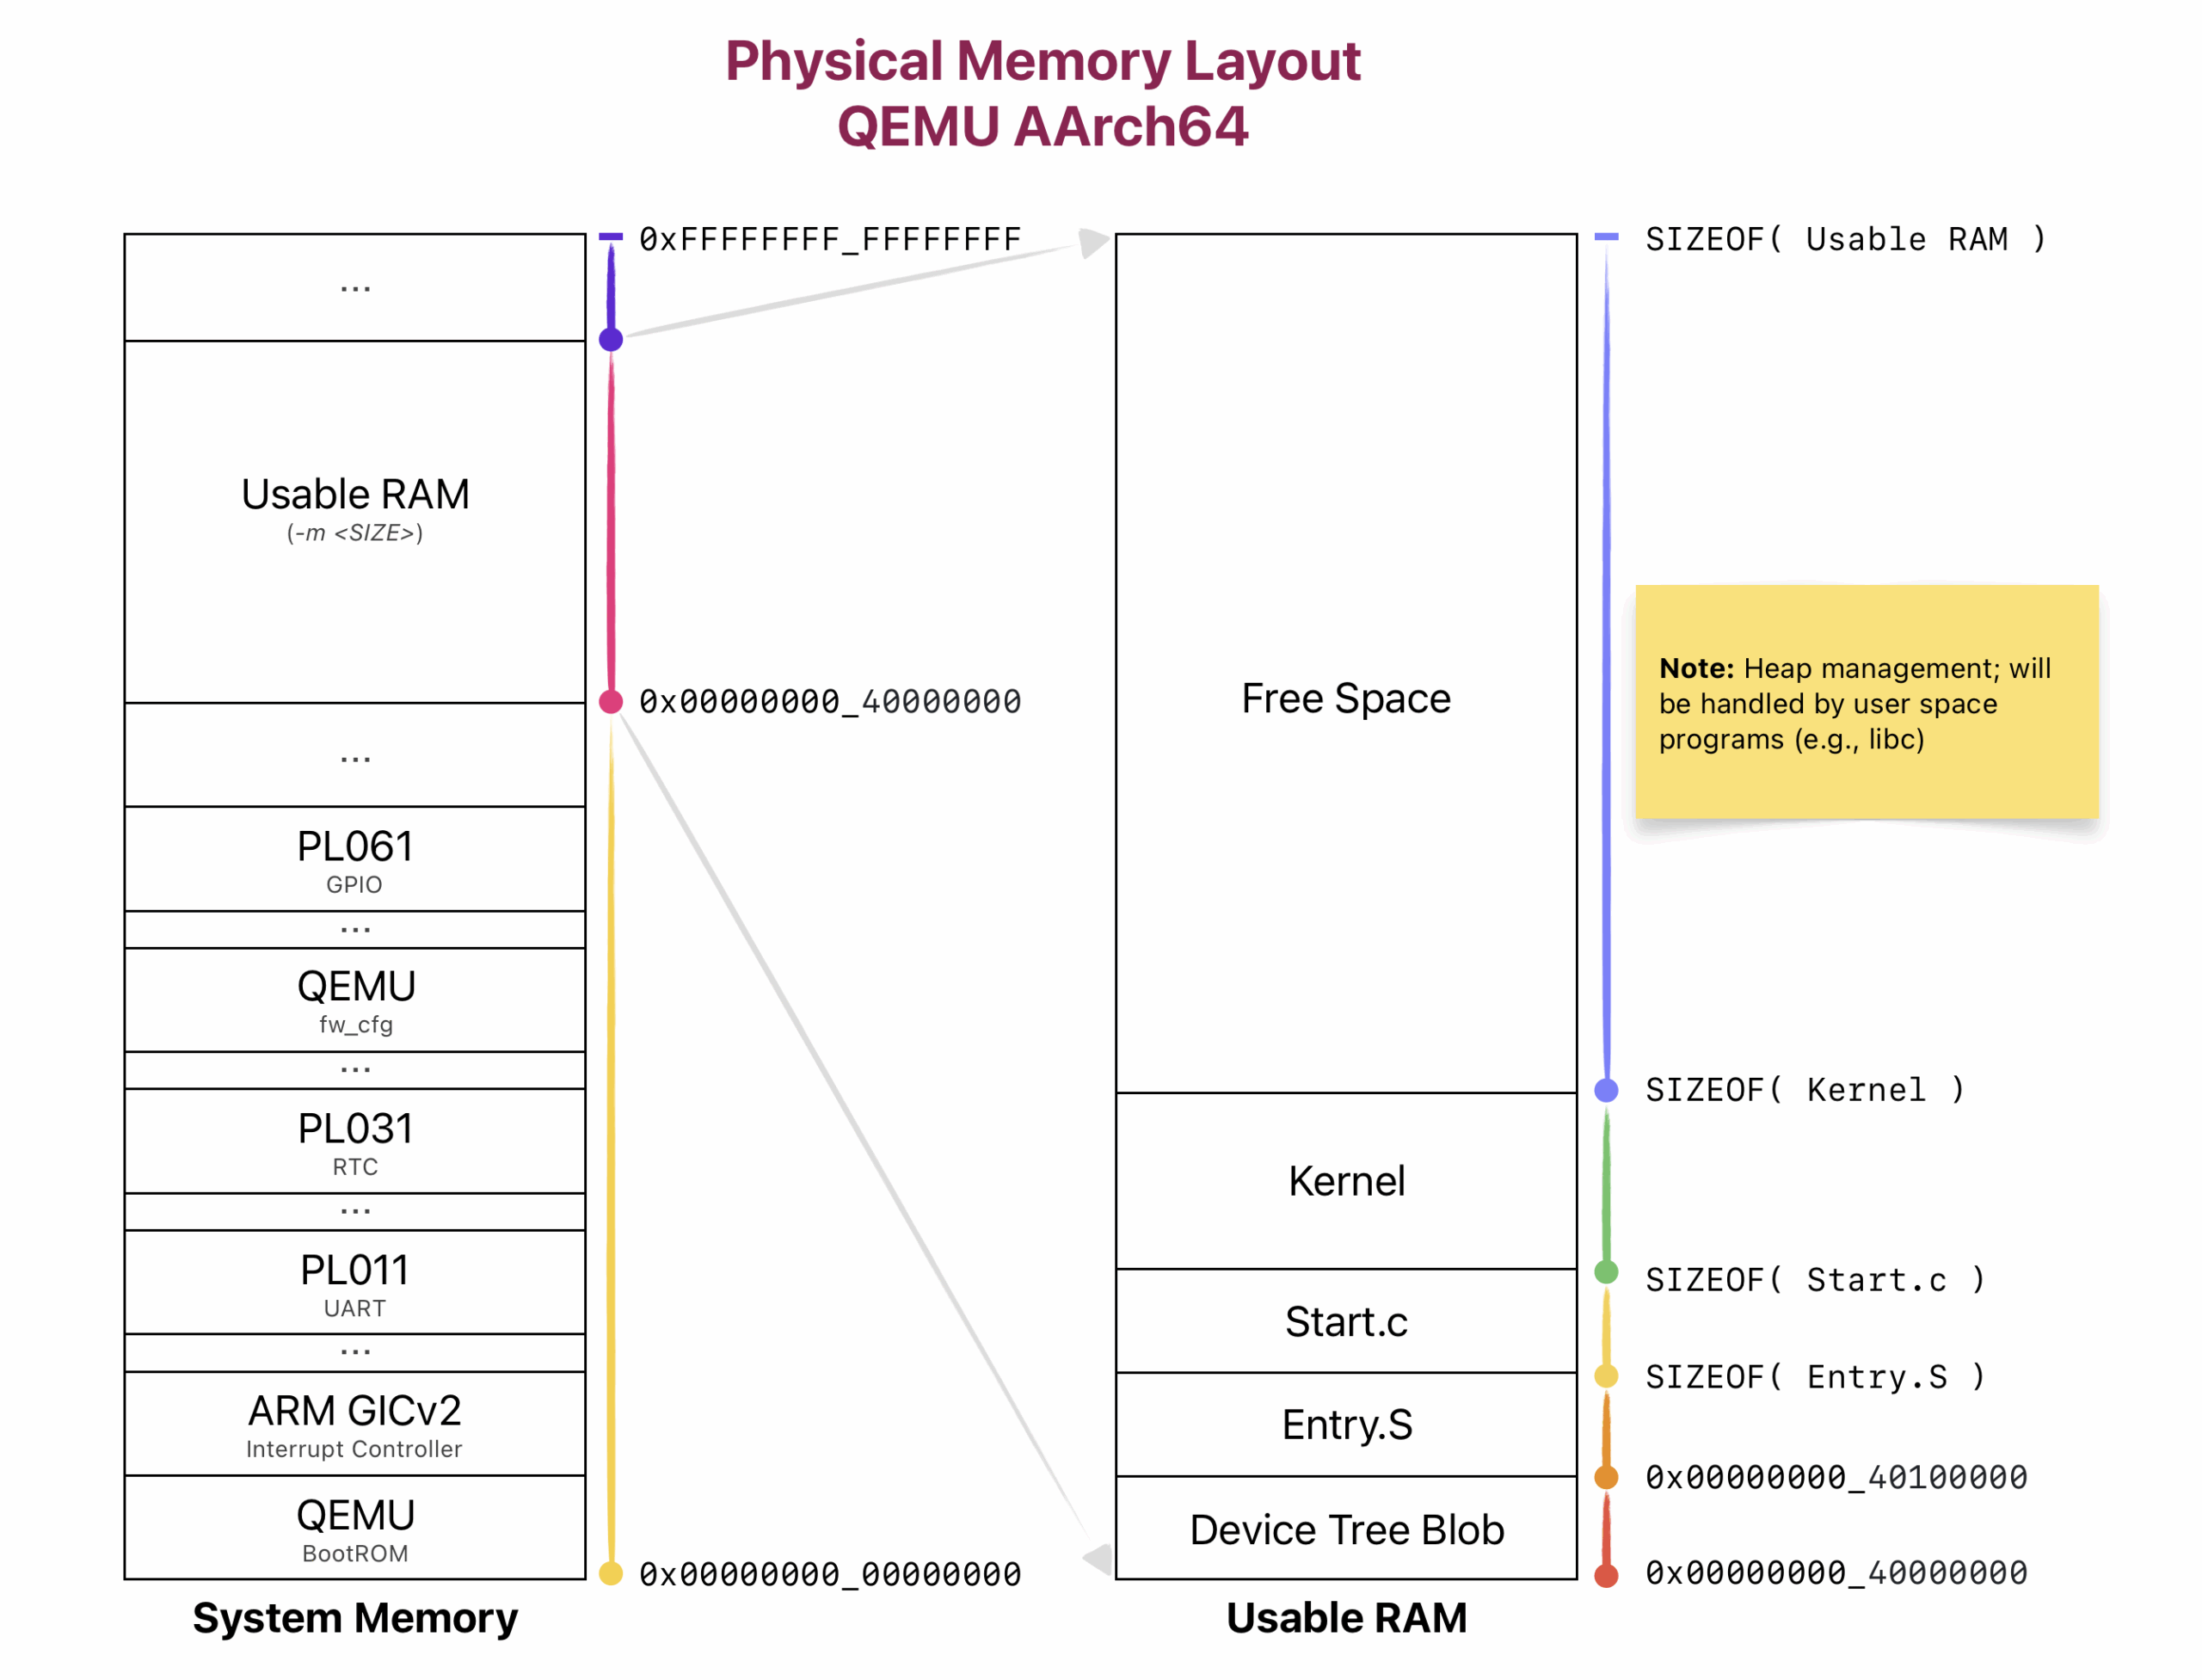
Let’s dive a bit more into inner working of things. The target machine is
very specific & static. I wanted to keep it as simple as possible by supporting
only the ARM64 architecture (ARMv8) and QEMU’s ARM Virt machine.
Here’s the target machine.
Only the must basic peripherals are defined. Sadly, this means no USB, NVME and
NIC. 🙁 Maybe in the future?
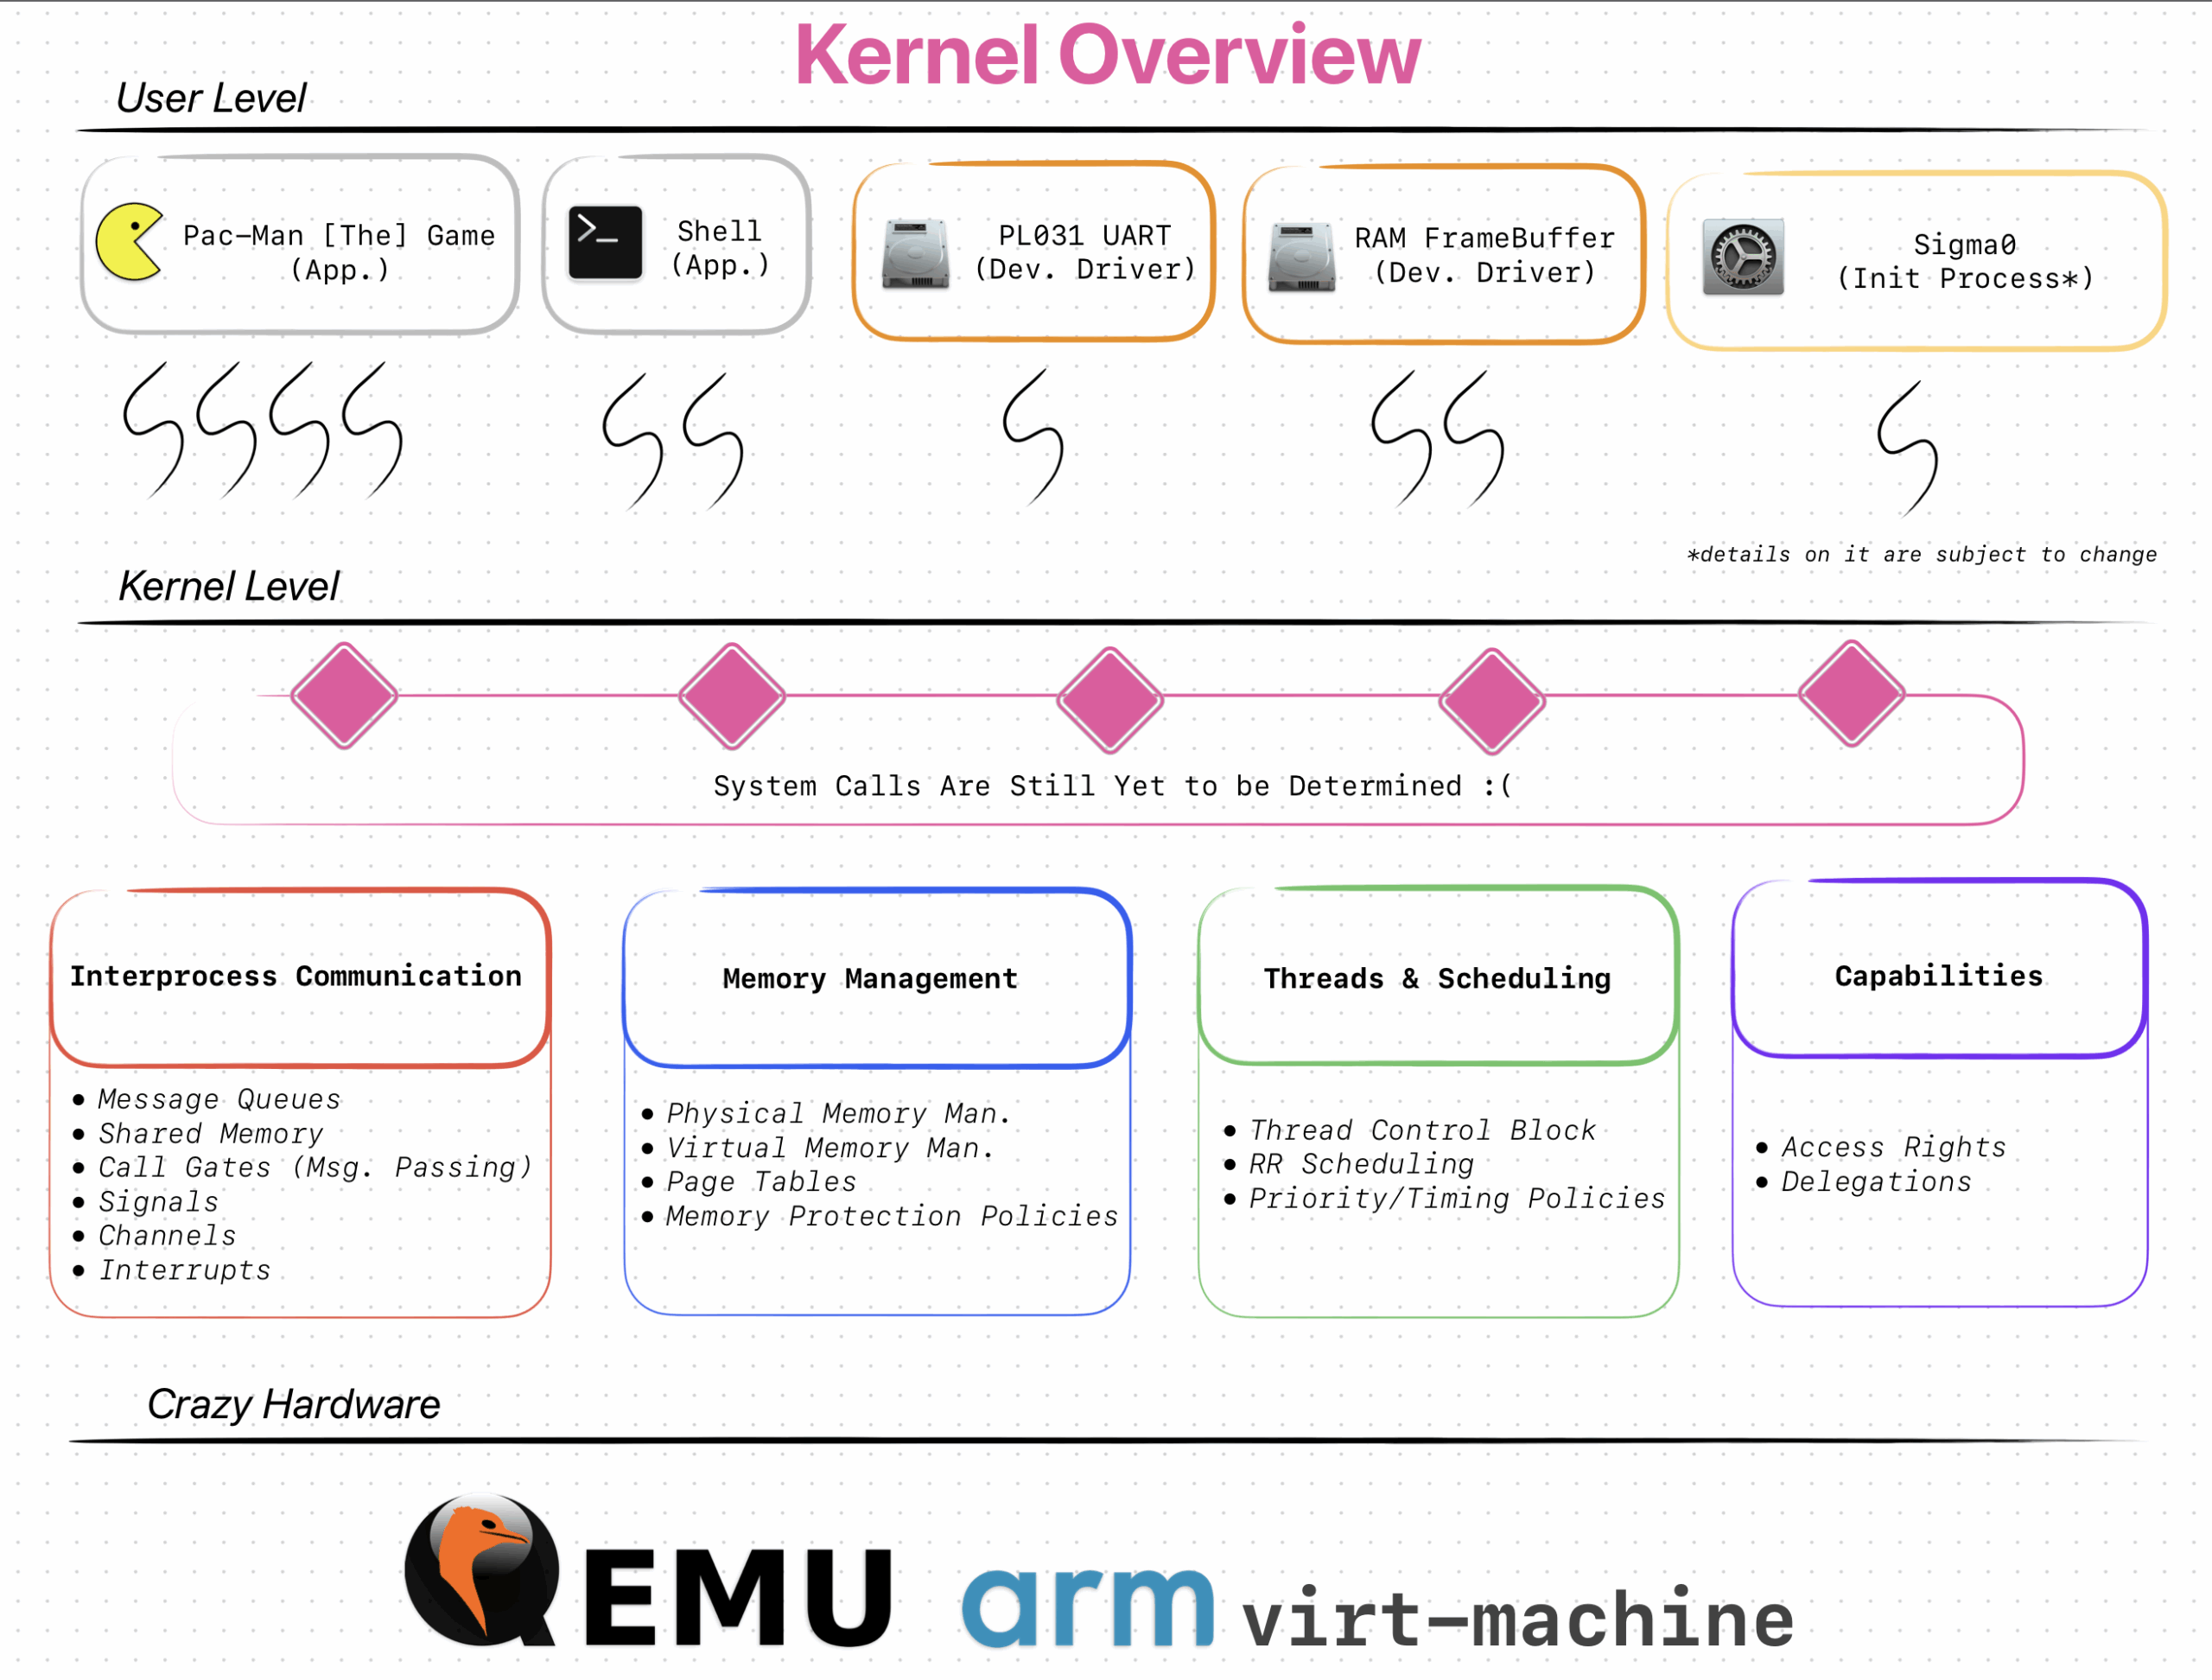
The kernel follows a simple microkernel design (like the L4-family). I wanted to
make a simple kernel that is easy to understand and help me learn as much as
possible during the process.
I initially followed the MIT’s xv6. However, when asked, people told me that it was a bit too
“naive/cheap” and would probably not help me IRL (they are amazing people btw).
So, I decided to take their advice and go with a microkernel design. it also
seems more interesting o.o
Warning! My hand-made microkernel design WILL trigger you. For example,
I put the device drivers in the user space AND the scheduler inside
the kernel space (basically not really following a “proper/acedemic” design).
Just give me some time. I am still learning as I go >.<
Here’s an overall overview of the kernel. (TODO: Will be updated soon…)
TODO: Overall OS specifications. What is what and the future goals.
Directory Structure
|-- Build              <- Compiled objects, binaries & debug files
|-- Documents          <- Reference documents
|-- Emulation          <- QEMU scripts & Device Tree Structure
|-- Kernel             <- The source code. Headers, C and C++ files
|   `-- Arch           <- Architecture related code
|   `-- Drivers        <- Driver source and header files
|   `-- Library        <- Library source and header files
|   `-- Include        <- Kernel header files
|-- Media              <- Images and other media
|-- Toolchain          <- Cross-compiling environment
|-- Userland           <- User level source code
|   `-- Dir.           <- TBD.
|-- .gitignore         <- Good ol' .gitignore
|-- Makefile           <- Makefile
`-- README.md          <- Main README
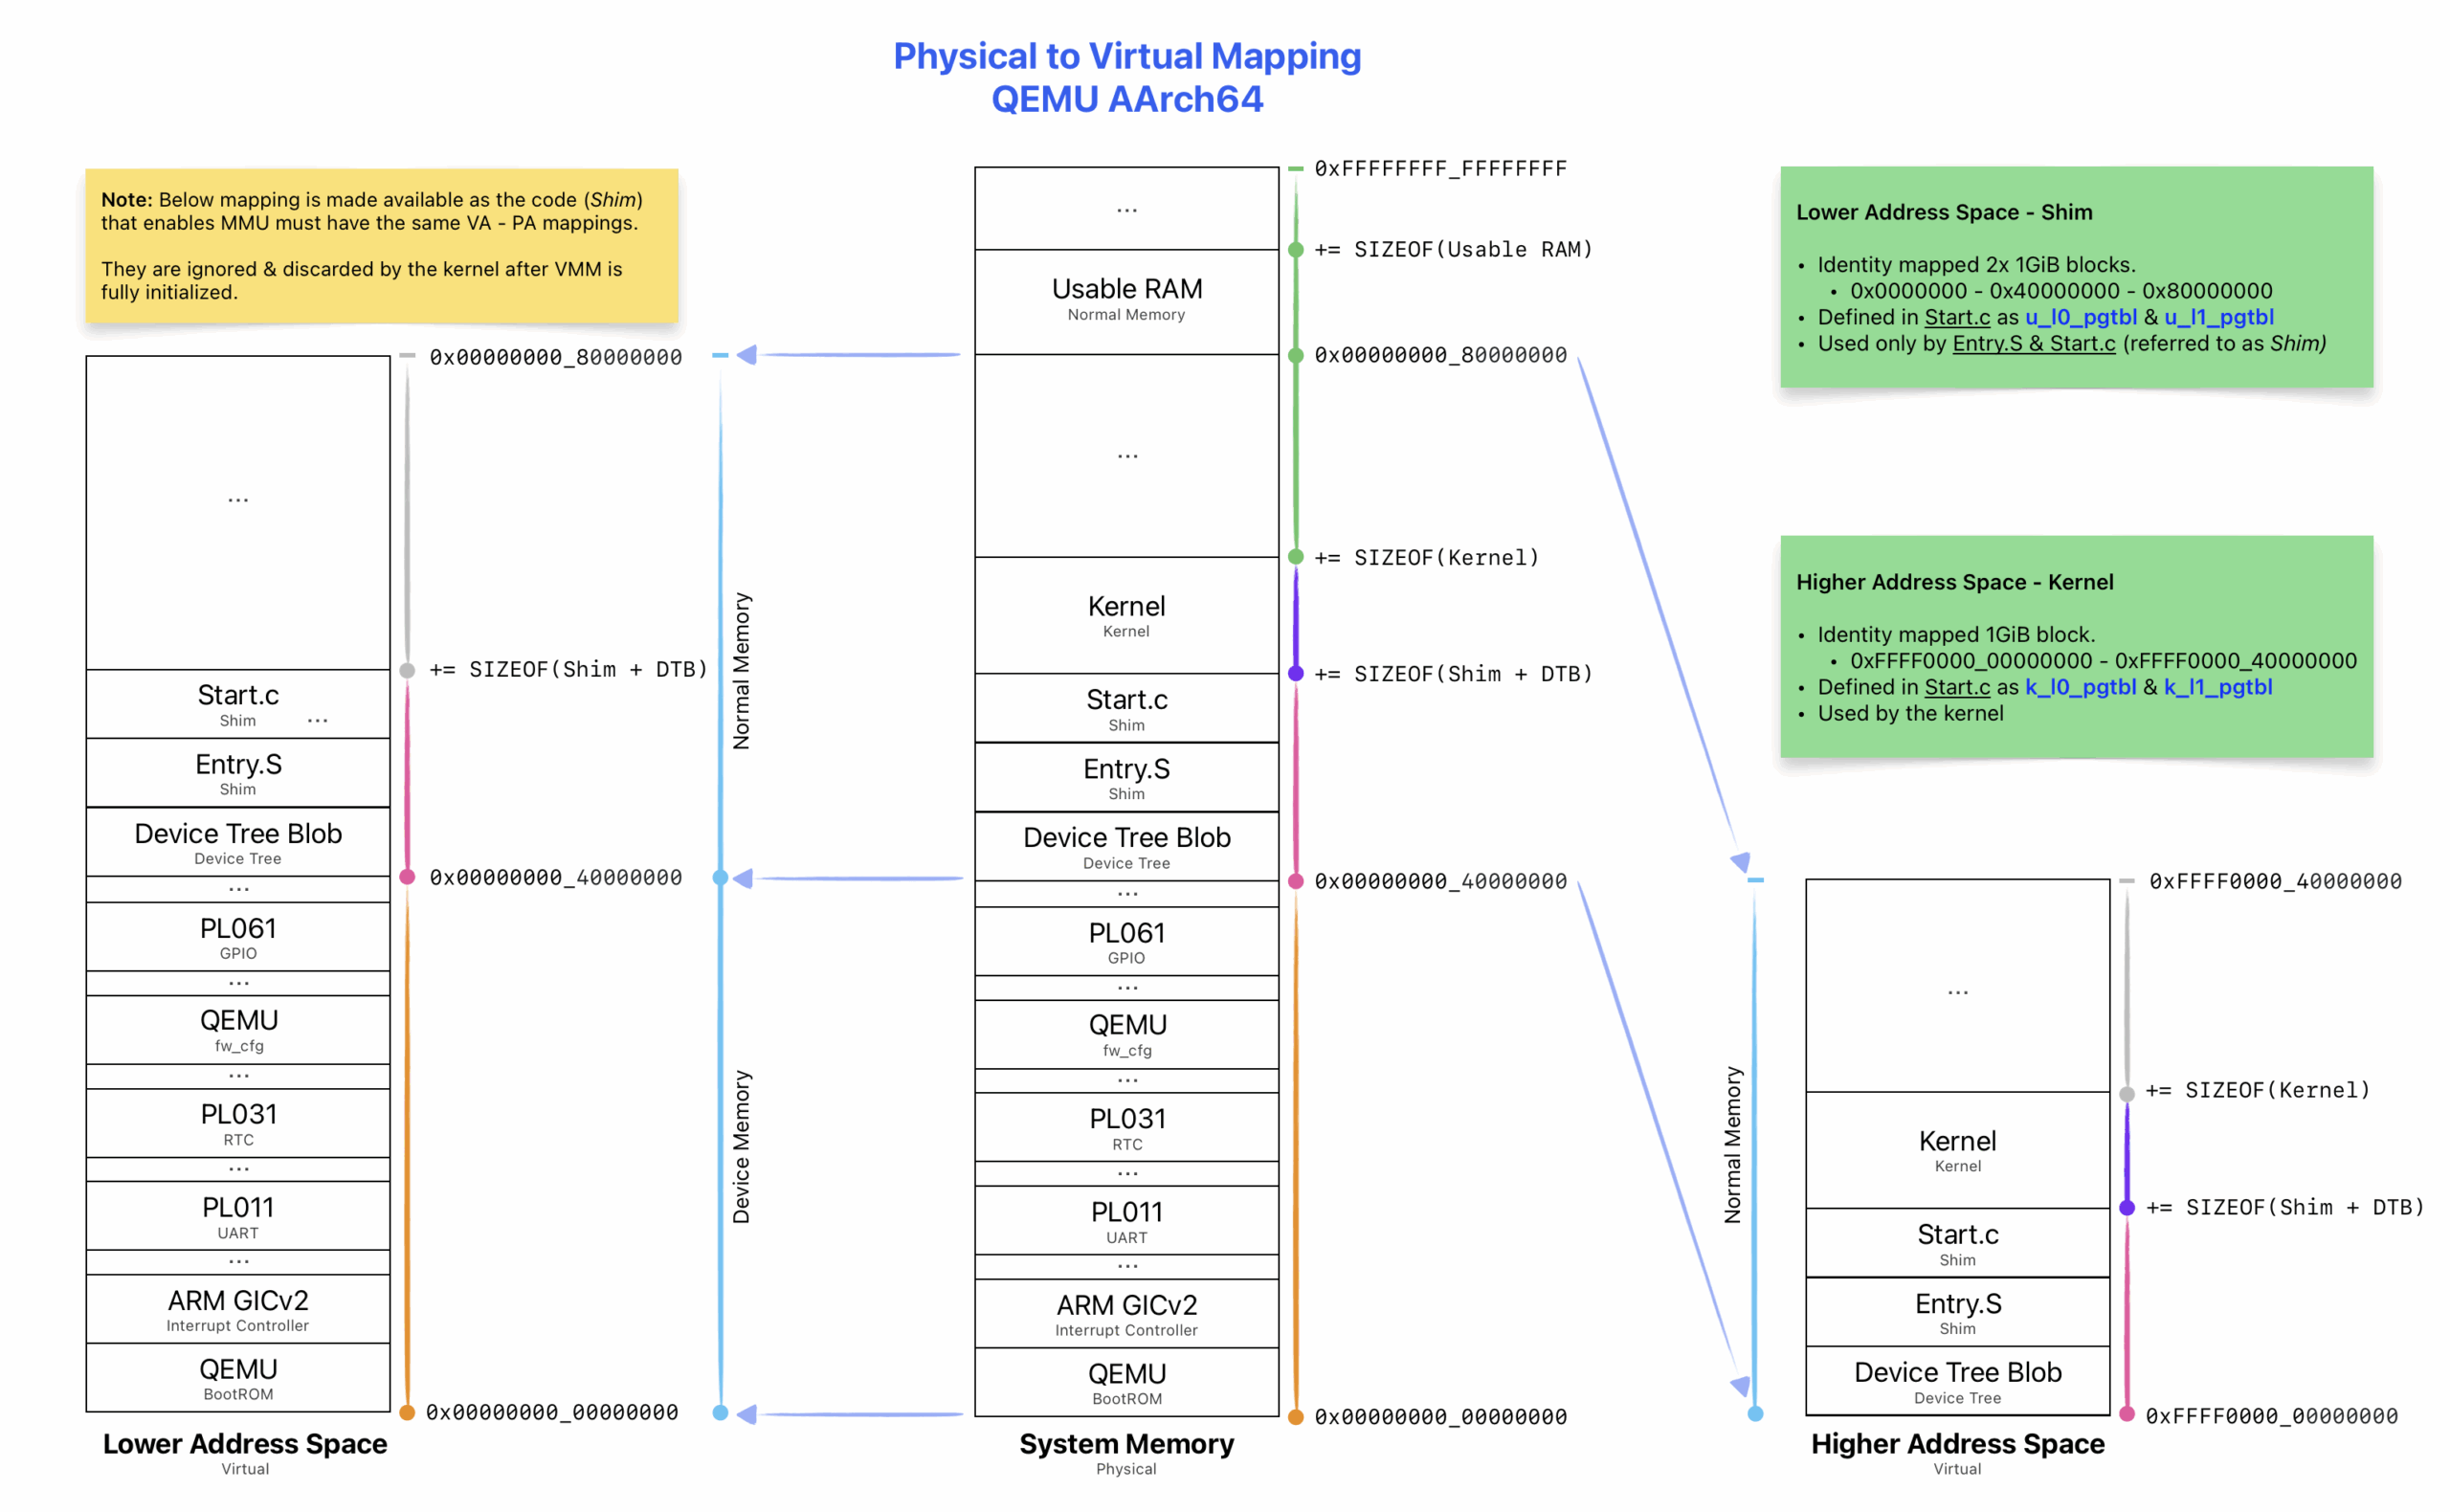
Bootstrapping (a.k.a. Shim)
Currently, the only way to boot WesterOS is on QEMU’s AArch64 virt machine via the -kernel parameter.
The part responsible for launching the kernel (and therefore the OS) is called Shim.
It is a small piece of code linked alongside the kernel image and responsible for bootstrapping the system.
It handles some operations before the kernel takes control.
State of ARM64 machine (e.g., registers) right before kmain()
VBAR: 0xffff000040108000
Kernel Page Tables
Level 0 @ 0x40101000
Array of 512 uint64_t’s
Index 0 : 0x40102003
Level 1 @ 0x40102000
Array of 512 uint64_t’s
Index 1: 0x40000701
User Page Tables
Level 0 @ 0x40103000
Array of 512 uint64_t’s
Index 0 : 0x40104003
Level 1 @ 0x40104000
Array of 512 uint64_t’s
Index 1: 0x40000701
MAIR_EL1: 0xbbff440c0400
Attbr 0: 0b00000000 (DEVICE_nGnRnE)
Attbr 1: 0b00000100 (DEVICE_nGnRE)
Attbr 2: 0b00001100 (DEVICE_GRE)
Attbr 3: 0b01000100 (NORMAL_NC)
Attbr 4: 0b11111111 (NORMAL)
Attbr 5: 0b10111011 (NORMAL_WT)
Attbr 6: 0b00000000 (Res)
Attbr 7: 0b00000000 (Res)
TCR_EL1: 0x480100010
DS: 0b0 (48 bit)
IPS: 0b100 (44 bits, 16TB)
T1SZ: 0b01000 (16)
T0SZ: 0b01000 (16)
HPDN1: 0b0 (Hierarchical permissions enabled)
HPDN0: 0b0 (Hierarchical permissions enabled)
TBI1: 0b0 (Top Byte used)
TBI0: 0b0 (Top Byte used)
AS: 0b0 (8 bit)
A1: 0b0 (TTBR0_EL1.ASID defines the ASID)
EPD1: 0b0 (Perform table walk)
EPD0: 0b0 (Perform table walk)
TG1: 0b10 (4 KiB)
TG0: 0b00 (4 KiB)
SH1: 0b00 (Non-shareable)
SH0: 0b00 (Non-shareable)
ORGN1: 0b00 (Outer Non-cacheable)
ORGN0: 0b00 (Outer Non-cacheable)
IRGN1: 0b00 (Inner Non-cacheable)
IRGN0: 0b00 (Inner Non-cacheable)
TTBR1_EL1: 0x40101000 (k_l0_pgtbl)
TTBR0_EL1: 0x40103000 (u_l0_pgtbl)
SCTLR_EL1: 0xc50839
M: 0b1 (MMU enabled)
A: 0b0 (Alignment fault checking is disabled)
C: 0b0
SA: 0b1 (SP Alignment check enabled)
SA0: 0b1 (SP Alignment check enabled for EL0)
CP15BEN: 0b1 (System instruction memory barrier enabled for EL0 Aarch32)
I: 0b0 (Access to Stage 1 Normal memory from EL0 & EL1 are Stage 1 Non-cacheable)
Kernel
WesterOS kernel follows a microkernel design. Different people/orgs have
different interpretations on how a microkernel should be designed
(e.g., L4, Minix). Here I use the term micro as keeping the kernel as simple
as possible. This means:
No drivers in kernel-space
No services in kernel-space
No filesystem in kernel-space
No process management in kernel-space
All of the above would needed to be implemented as user-space applications.
Kernel will provide the following services & functions:
Memory Management (e.g., mmap())
Capabilities(?)
Interprocess Communication (e.g., msgsend(), msgrecv())
Channels (for IPC)
[POSIX] Signals
Threads (e.g., thread_create())
Interrupts (e.g., intr_attach())
Clock & Time (e.g., gettimeofday())
Synchronization (e.g., mutex, semaphore)
Schedular (e.g. yield())
The kernel requires an [initial] user image from the bootloader. This image
should contain the first ELF executable(s) that the kernel will launch (likely
the root task and the process manager).
Useer image can be thought as the initrd used in Linux systems.
The complete list of everything the kernel provides & inner workings of stuff
will be explained later down the road. I’m still yet to implement them..
As for reference, I made high use of the following microkernels & OSes:
TODO: Some fun stuff. What awaits someone one they launch the OS?
The following services are to be implemented:
Root Task
Launches other services predefined in a file. (e.g., services.config)
Similiar to the init task on Linux systems.
Will be the first user space application launched by the kernel.
Process Manager
Defines the necessarry APIs and abstractions to model a process.
Defines the system pathname(?) Similiar to QNX pathname manager.
Other programs (via libc) can spawn/launch/destroy/debug processes.
(should consider permissions & user rights)
Device Discovery
Provides the necessarry APIs to enumerate devices.
Builds a database/structure of all the devices within the system.
The database/structure is built from the:
[ARM] Device Tree Blob given by the root task. (TODO)
File System Manager
Provides an abstraction to the underlying filesystem. (e.g., ext2, MS-DOS)
Communicates with the available disk drivers. (TODO)
Registers all files & folders to the system pathname.
Installation
To build & run the operating system you need three main things: ARM GNU Toolchain, QEMU and a little bit of Patience™.
It is possible to build everything on your favorite operating system. ARM GNU Toolchain is available on both Windows, macOS and GNU/Linux. However, I have NOT tested Windows yet. So, you are alone in that space. Sorry 🙁
The below steps are for GNU/Linux (Aarch64) hosts.
0. Make sure you have git and make
$ apt install git make # if using `apt`
$ pacman -S git make # if using `pacman`
Choose the appropriate Aarch64 bare-matel target to download. The version should not matter, so choose the latest one. However, which hosted toolchain you download DOES matter. Choose the one that is created for your OWN operating system.
For example, if your OS is GNU/Linux (x86_64) then you download:
$ cd WesterOS/Toolchain
$ wget https://developer.arm.com/-/media/Files/downloads/gnu/12.2.rel1/binrel/arm-gnu-toolchain-12.2.rel1-aarch64-aarch64-none-elf.tar.xz
It is your responsibility to verify the “integrity” and “signature” of the downloaded file. Use the SHA256 keys provided in the downloads page.
3. Extract the downloaded ARM GNU Toolchain
Make sure to extract it while in Westeros/Toolchain.
$ tar -xvf arm-gnu-toolchain-12.2.rel1-aarch64-aarch64-none-elf.tar.xz
4. Modify the TOOLCHAIN_PATH in the Makefile
The TOOLCHAIN_PATH should point to your newly downloaded and extracted ARM GNU Toolchain. Since your host OS and toolchain version might be different than mine, you MUST edit the PATH variable.
If not set correctly, the make process WILL fail with an error message like:
make[1]: Toolchain/arm-gnu-toolchain-12.2.rel1-darwin-arm64-aarch64-none-elf/bin/aarch64-none-elf-as: No such file or directory
So, make sure to edit the TOOLCHAIN_PATH.
# Open the main Makefile /w your favorite text editor
$ vim Makefile
# And change the `TOOLCHAIN_PATH` accordingly. For example..> TOOLCHAIN_PATH=Toolchain/arm-gnu-toolchain-12.2.rel1-darwin-arm64-aarch64-none-elf
# Save & exit
5. Build using make
$ make all
The build ends with a message Build complete. Enjoy life <3. If you don’t see it, contact me. I’ll try the fix the issue >.<
Run/Emulate
WesterOS can ONLY be run using QEMU. I have no plans to make a fully-bootable image for real-world hardware. Originally my idea was to emulate a Raspberrry Pi 4b, but I realized it might not that be “beginner friendly” when testing and deubgging. So, QEMU it is!
Shameless plug time! If you want more about QEMU, visit my QEMU_Starter GitHub thingy.
0. Make sure you have qemu-system-aarch64 installed
$ apt install qemu-system qemu-utils # if using `apt`
$ pacman -S qemu-full # if using `pacman`
1. Launch WesterOS
$ make run
As of 9 July 2023, the WesterOS is straight-up empty! So, you can’t do anything except to see some very basic kernel messages on the terminal :/
Then again, WesterOS is a hobbyist operating system and a learning process. You should really try to explore it’s source code. I’m sure you will have more fun there.
Explore
TODO: Navigate the user to another README which is basically the documentation.
This tool is a cyber security library to resolve function pointers to loaded modules in memory, such as functions provided by Windows DLL’s (or any other DLL with exported functions). May only be used where you have legal permission from the system owner to use this.
Install via: cargo add export-resolver or add export-resolver = "1.0.2" to your Cargo.toml.
The library is instantiated with ::new().
When you wish to use a pointer to the required function in your code, you can simply use .add to resolve that function at runtime, it will then append the function virtual address to a vector of your resolved exports (all added with the .add function)
To then get the function pointer, you can use the get_function_address function, which will return an Result of a usize, where the usize is the memory address.
Valid only for x64.
Example
fnmain(){// Create a new instance of the ExportListletmut exports = ExportList::new();// Add the desired functions to the ExportList structure, this will resolve and save the virtual addresses// These calls may cause an Error if the function cannot be found; .add returns Result<(), ExportError>let _ = exports.add("ntdll.dll","NtOpenProcess");let _ = exports.add("ntdll.dll","NtQuerySystemTime");// Attempt to get the virtual address; returns returns Result<(), ExportError> - an error will be returned where// the input function name cannot be found in the vector of resolved functions (i.e. if the above step failed)// or you have a typo.let _nt = match exports.get_function_address("NtOpenProcess"){Ok(v) => println!("NT: {:x}", v),Err(e) => println!("Eeee {}", e),};}
LEGAL DISCLAIMER
This project, including all associated source code and documentation, is developed and shared solely for educational, research, and defensive purposes in the field of cybersecurity. It is intended to be used exclusively by cybersecurity professionals, researchers, and educators to enhance understanding, develop defensive strategies, and improve security postures.
Under no circumstances shall this project be used for criminal, unethical, or any other unauthorized activities. This is meant to serve as a resource for learning and should not be employed for offensive operations or actions that infringe upon any individual’s or organization’s rights or privacy.
The author of this project disclaims any responsibility for misuse or illegal application of the material provided herein. By accessing, studying, or using this project, you acknowledge and agree to use the information contained within strictly for lawful purposes and in a manner that is consistent with ethical guidelines and applicable laws and regulations.
USE AT YOUR OWN RISK. If you decide to use this software CONDUCT A THOROUGH INDEPENDENT CODE REVIEW to ensure it meets your standards. No unofficial third party dependencies are included to minimise attack surface of a supply chain risk. I cannot be held responsible for any problems that arise as a result of executing this, the burden is on the user of the software to validate its safety & integrity. All care has been taken to write safe code.
It is the user’s responsibility to comply with all relevant local, state, national, and international laws and regulations related to cybersecurity and the use of such tools and information. If you are unsure about the legal implications of using or studying the material provided in this project, please consult with a legal professional before proceeding. Remember, responsible and ethical behavior is paramount in cybersecurity research and practice. The knowledge and tools shared in this project are provided in good faith to contribute positively to the cybersecurity community, and I trust they will be used with the utmost integrity.
This project will ONLY work on certain architectures (x64) by design so it is not an ‘out of the box’ offensive tool (responsible contribution to the security community).
DeepFryer (Deep Learning Framework for your Expression RNA-seq data) is a package built in Python 3.6 (Van Rossum et al., 2009) that orbitates around Google’s Tensorflow backend (Abadi et al., 2016) and Keras API for the implementation of Deep Learning algorithms (Chollet et al., 2015). Among its functionalities it integrates Pandas, Pyarrow, Numpy, Scipy, Scikit-learn, Matplotlib (McKinney, 2011; Lowe, 2017; Walt et al., 2011; Jones et al., 2014; Pedregosa et al., 2011; Hunter, 2007) at the central core for the different steps during the analysis. This framework is organized in four big modules that cover data processing, analysis and correction of batch effects or unwanted variation, deep learning modeling and relevant information extraction from models with gene ontology analysis.
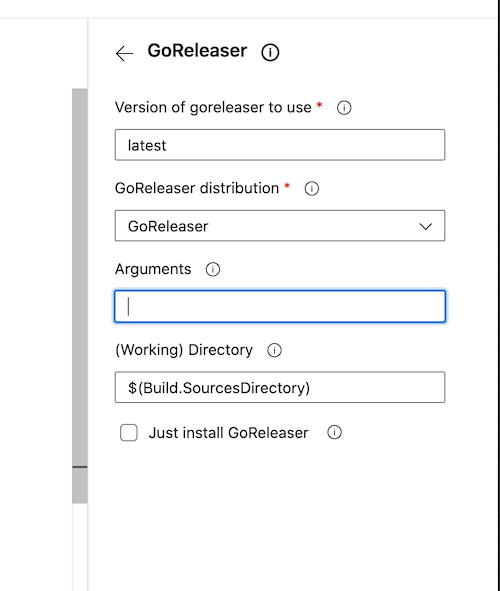
GoReleaser distribution, either goreleaser or goreleaser-pro
version¹
String
latest
GoReleaser version
args
String
Arguments to pass to GoReleaser
workdir
String
$(Build.SourcesDirectory)
Working directory (below repository root)
installOnly
Bool
false
Just install GoReleaser
¹ Can be a fixed version like v0.132.0 or a max satisfying semver one like ~> 0.132. In this case this will return v0.132.1.
For the pro version, add -pro to the string
Environment variables
Following environment variables can be used, as environment variable.
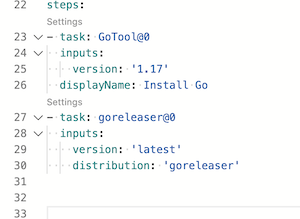
Library with the Recovery Mode, SIP, Sandbox, User detection, NVRAM and network detection functions used by TINU
Features and usage
SimpleReachability:
Provvides a simple way to check if network conenction is available.
Basic example usage
import TINURecovery
print("Is the computer connected to the network? \(SimpleReachability.status ?"Yes":"No")")
Recovery:
WARNING: Requires sandboxing to be disabled.
[Available only on macOS] detects if the current program is running inside a macOS Installer/Recovery OS and allows for debugabbility inside a normal macOS by creating a subclass and overriding the ‘simulatedStatus’ value.
Basic example usage:
import TINURecovery
print("Is this program running on a macOS Recovery/Installer OS? \((Recovery.status ?"Yes":"No"))")
SIP:
WARNING: Requires sandboxing to be disabled.
[Available only on macOS] detects the status of macOS’s SIP (System Integrity Protection) and allows for debugabbility reguardless of the actual status of it on the computer by creating a subclass and overriding the ‘simulatedStatus’ propery.
Basic example usage:
import TINURecovery
iflet status =SIP.status.resultsEnabled {print("Is SIP activated? \(status ?"Yes":"No")")}else{print("SIP status is unknown")}print("Does SIP use a custom configuration? \(SIP.status.usesCustomConfiguration ?"Yes":"No")")
Sandbox:
[Available only on macOS] Used to detect if the current app is running with the app Sandbox enabled or not.
Example usage:
import TINURecovery
print("Is this app sandboxed? \(Sandbox.isEnabled ?"Yes":"No")")
User:
[Available only on macOS] Just a more convenenint way of getting the current user’s logon name and if it’s the Root user.
Example usage:
import TINURecovery
print("Is this user Root? \(CurrentUser.isRoot ?"Yes":"No")")print("What's the user name? \(CurrentUser.name)")
NVRAM:
WARNING: Requires sandboxing to be disabled.
[Available only on macOS] A simple way to read and write NVRAM values
This library should be used by swift apps/programs that requires to obtain particular info about the system, things like the SIP status, or particular info about the app/program itself like the if sandboxing is enabled.
This code is intended for macOS only, it might also work on other Apple’s OSes for the non-macOS-specific features but it’s untested.
About the project
This code was created as part of my TINU project (https://github.com/ITzTravelInTime/TINU) and has been separated and made into it’s own library to make the main project’s source less complex and more focused on it’s aim.
Also having it as it’s own library allows for code to be updated separately and so various versions of the main TINU app will be able to be compiled all with the latest version of this library.
TINURecovery: Library with the Recovery Mode, SIP, Sandbox, User detection, nvram and network detection functions used by TINU.
Copyright (C) 2021-2022 Pietro Caruso
This library is free software; you can redistribute it and/or modify it under the terms of the GNU Lesser General Public License as published by the Free Software Foundation; either version 2.1 of the License, or (at your option) any later version.
This library is distributed in the hope that it will be useful, but WITHOUT ANY WARRANTY; without even the implied warranty of MERCHANTABILITY or FITNESS FOR A PARTICULAR PURPOSE. See the GNU Lesser General Public License for more details.
You should have received a copy of the GNU Lesser General Public License along with this library; if not, write to the Free Software Foundation, Inc., 59 Temple Place, Suite 330, Boston, MA 02111-1307 USA
This game is a fantasy tabletop role-playing game where you delve in dungeons and destroy dragons.
It is made with the following goals:
Easy to pick up and run very quickly.
Able to play with modules and adventures made for other dragon-slaying, dungeon-delving fantasy systems with little work.
A fiction-first game.
A great system for a first-time role-playing game player, whether that’s in the role of a game master or a player with a character.
Easily ran in cooperative or solo modes with little-to-no outside supplements necessary.
Easily able to adapt monsters and NPCs from material published for other similar games, but also easy to create your own from scratch.
Player character death is not an extremely rare occurence.
Easily hackable and open-source.
COPYING
The source code of this work is licensed under the AGPL v3 license.
If you take this source code and modify it to make your own game or product, you must also share your changes and license those changes under the AGPL v3 license.
The mechanics and content of this work is licensed under the CC-BY-SA 4.0 license.
If you use mechanics or other content of this work to make your own game or product, you must also license it under the CC-BY-SA 4.0 license.
If you are taking the source code and using it in something you are making, that falls under the AGPL v3 license stipulations.
If you are taking the mechanics and content and using those in something you are making, that falls under the CC-BY-SA 4.0 license stipulations.
It is possible you take both the source code and the mechanics and content for the same project.
The resulting code for such a project falls under AGPL v3 and the resulting mechanics and content fall under CC-BY-SA 4.0.


 https://github.com/FranciscoImanolSuarez/Huddle-landing-page